10 Makeup Station DIY Ideas
A personalized makeup station is a dedicated workspace designed to streamline grooming routines while organizing cosmetics, brushes, and skincare products efficiently. Having a functional vanity setup prevents clutter from accumulating on bathroom counters and safeguards expensive beauty investments from moisture damage. This informative article offers complete, step-by-step guidance on constructing ten distinct beauty stations tailored to various room sizes and design aesthetics. Readers will learn how to select proper lighting, optimize drawer layouts, mount structural shelving, and repurpose common household furniture items into beautiful storage units. This knowledge is incredibly useful for maximizing small bedroom layouts, improving morning efficiency, and introducing an organized focal point to your dressing area. Building a customized vanity independently allows creators to dictate the exact storage capacity and mirror placement to suit their unique cosmetic collection. This guide covers every essential detail from basic tabletop configuration to wall-anchored floating assemblies, providing clear methods for achieving high-quality results. By following these original layouts, anyone can transform a chaotic product pile into a systematic, accessible, and structured beauty station that blends utility with clean home decor design.
Why This Idea Is Trending or Useful
Dedicated cosmetic desks have become major trending ideas across modern design platforms because they offer high practical value and clever organization solutions for contemporary homes. With the rise of detailed skincare routines and extensive product collections, standard medicine cabinets no longer provide adequate storage volume or proper organizational separation. Building a custom setup has a massive DIY appeal, allowing individuals to design tailored compartments for specific bottle heights and brush styles without purchasing expensive pre-made vanities. These creative ideas are exceptionally popular because they are beginner friendly and can be completed using affordable budget ideas. Even novices with no carpentry experience can assemble a highly functional station by combining basic modular shelving units, sleek mirrors, and clear acrylic organizers. Additionally, these projects enhance the overall aesthetic of a bedroom, bringing a clean minimalist style or a high-end dressing room feel into everyday living spaces. By emphasizing vertical wall storage and efficient desk footprints, these handmade setups demonstrate that luxury organization is accessible to everyone, regardless of space constraints or limited financial investment.
Materials and Preparation
Achieving a highly stable and functional vanity station requires detailed material preparation and careful structural planning before starting assembly. The primary building components typically include solid wooden panels, pre-cut MDF boards, sturdy metal brackets, floating wall shelves, and durable clear acrylic dividers. Ensuring optimal visibility during cosmetic application requires incorporating proper lighting sources, such as stick-on LED vanity bulbs, dimmable light strips, or desktop ring lamps that mimic natural daylight. Essential tools for these projects include a cordless drill, leveling tool, tape measure, wall anchors, sandpaper, wood glue, and microfiber cloths for final cleaning.
Preparation steps begin with measuring the available floor and wall space in your bedroom or dressing area to determine the ideal station dimensions. Clear the workspace entirely and lay down a drop cloth to protect flooring from paint scratches or wood dust during construction. Prior to mounting any heavy shelves or mirrors, use a stud finder to locate the structural wall supports, ensuring your setup can safely bear weight over time. Planning considerations must also factor in electrical outlet accessibility, as proximity to power sources dictates where lighted mirrors, hair dryers, and heated styling tools can be safely operated and stored.
Floating Shelf Compact Dressing Hub
Setup Method
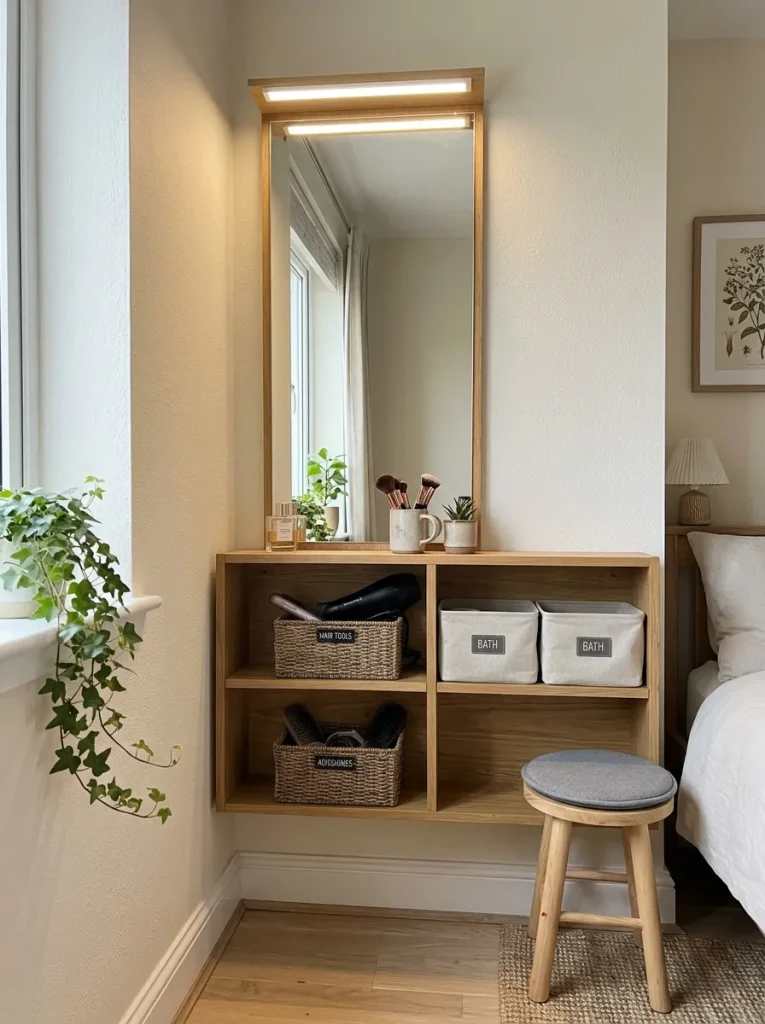
The floating shelf beauty hub utilizes vertical wall space to create a fully functional grooming area without sacrificing valuable bedroom floor space. This minimalist style design relies on heavy-duty wall brackets and a thick solid wood or laminate panel to serve as the main tabletop surface. By elevating the entire desk off the ground, you create an open, airy aesthetic that makes small bedrooms appear significantly larger. A sleek, frameless mirror mounted directly above the shelf completes the modern design, transforming any empty wall indentation into a highly efficient, dedicated preparation zone.
To execute this easy project, begin by locating the wooden studs inside your wall using a reliable stud finder tool. Measure and mark a height of thirty inches from the floor, using a bubble level to ensure a perfectly straight horizontal mounting line. Secure two heavy-duty industrial metal L-brackets into the wall studs using a cordless drill and deep wall screws. Place a pre-cut wood panel measuring sixteen inches deep and thirty-six inches wide on top of the brackets, securing it from underneath with short wood screws. Mount a lightweight circular mirror directly above the wood panel, then arrange clear acrylic organizational trays on the surface to hold daily cosmetics.

Reclaimed Writing Desk Transformation
Step-by-Step Guide
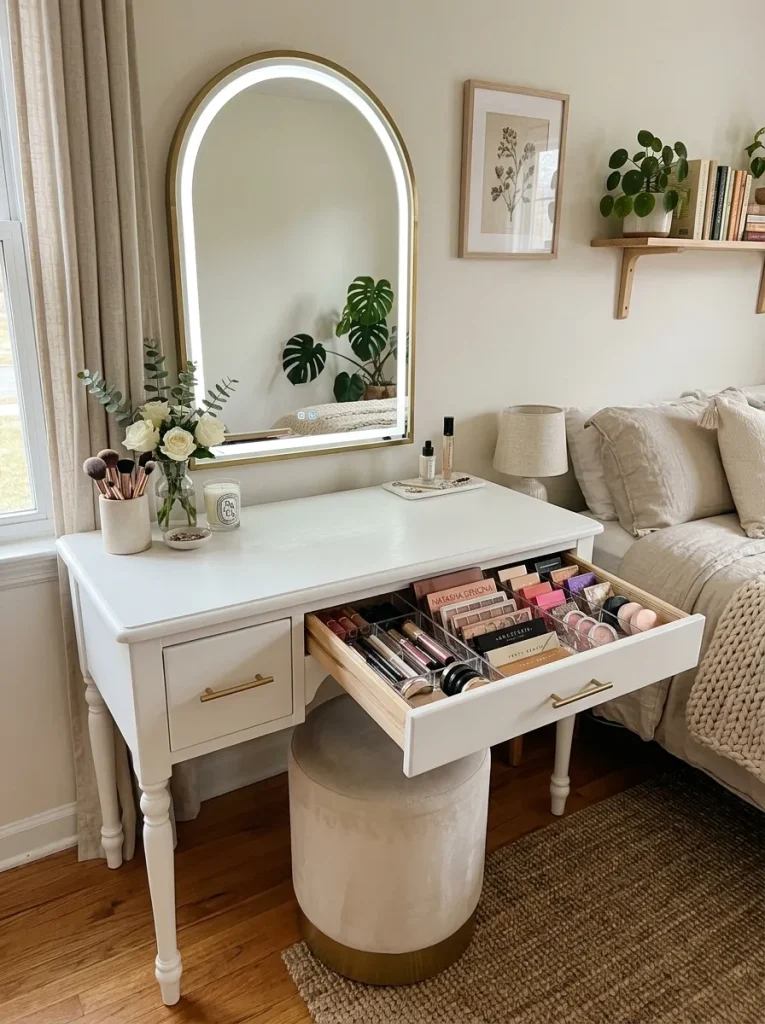
Transforming an old or outdated writing desk into a specialized beauty station is an excellent way to implement sustainable, handmade home decor. Writing desks inherently possess flat, wide work surfaces and built-in drawers, making them the perfect foundation for structured cosmetic organization. This project focuses on refinishing the exterior wood and modifying internal drawer compartments to hold shallow makeup palettes and brush rolls. The final aesthetic bridges classic furniture design with modern utility, providing a sophisticated centerpiece for large bedrooms or walkthrough dressing closets.
Start by removing all drawers and hardware, such as knobs and pulls, from the old wooden writing desk. Lightly sand the entire exterior surface of the desk with medium-grit sandpaper to remove old varnish, flaky paint, or surface stains. Wipe away the residual wood dust with a damp microfiber cloth, then apply two thin, even coats of durable satin furniture paint. Once dry, line the interior of each drawer with wipeable adhesive vinyl liner to protect the wood from liquid foundation spills. Place modular plastic bin organizers inside the shallow drawers to separate eye products, lipsticks, and facial creams systematically before reinstalling the upgraded modern drawer pulls.
Corner Wardrobe Floating Console
How to Create
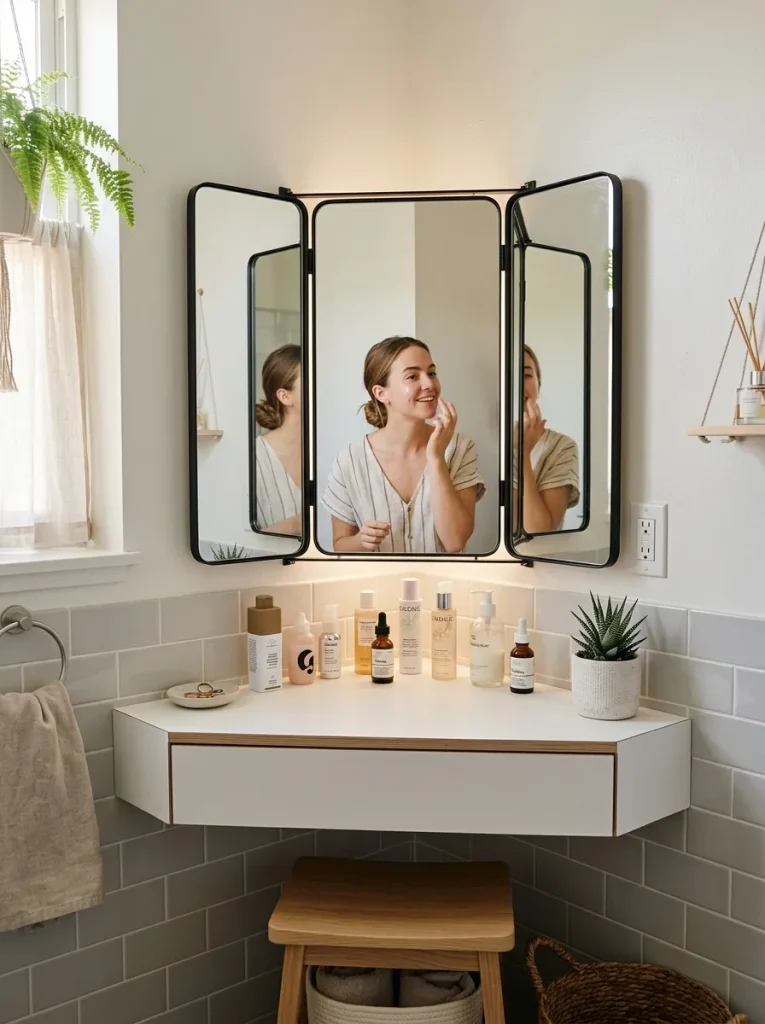
Corner consoles maximize underutilized bedroom alcoves by nesting a triangular or L-shaped surface directly into a ninety-degree wall intersection. This layout is highly practical for small apartments where a standard rectangular desk would block walking paths or door openings. The corner positioning naturally creates an intimate, cozy dressing nook that isolates your cosmetic routine from the rest of the busy living area. Utilizing a tri-fold or angled corner mirror setup within this configuration allows you to view your profile from multiple angles simultaneously during hair styling.
Begin by cutting a thick piece of plywood into a perfect right-angle triangle that matches the precise dimensions of your bedroom corner. Sand the raw edges smooth and apply a clean white laminate coating or wood stain to match your existing bedroom furniture decoration. Fasten two-inch wooden ledger strips along both walls at your desired vanity height using a drill and heavy-duty toggle bolts. Rest the triangular wood panel directly onto the ledger strips, screwing down through the top face to lock the console firmly into the corner apex. Mount a vertical lighted mirror on one wall and install small floating corner shelves above the desk to hold tall skincare bottles.
Modular Storage Cube Vanity Base
Execution Process
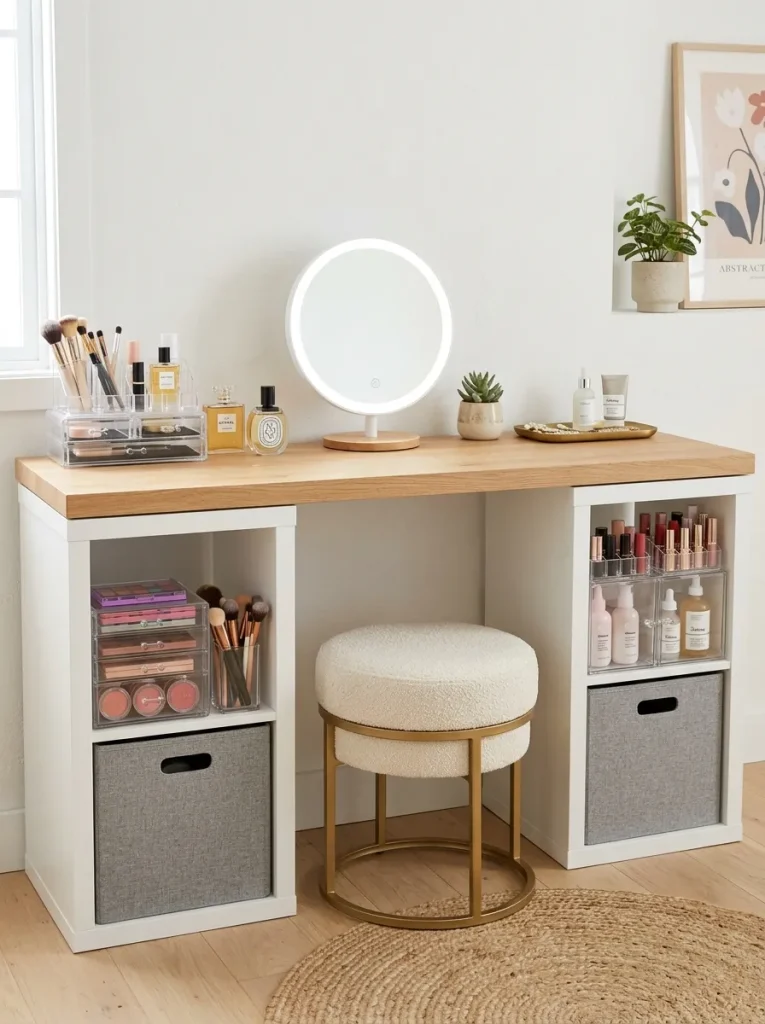
The modular storage cube concept uses two matching square organizer units as the sturdy structural legs to support a long, flat desktop panel. This beginner friendly project requires absolutely no complex joinery or advanced woodwork, making it a highly accessible option for weekend crafting. The open storage cubes provide massive organization potential, allowing you to insert fabric bins, woven baskets, or acrylic drawers directly into the square cavities. This design provides exceptional storage volume for individuals who possess extensive hair styling tool collections and large cosmetic palettes.
Purchase two identical four-cube modular storage organizers and assemble them according to the included package instructions. Position the two assembled cube units parallel to each other on the floor, leaving a twenty-four-inch gap between them to accommodate a vanity chair. Place a pre-cut, heavy wood countertop panel across the top surfaces of both cube units, ensuring equal overhang on the front and sides. Secure the top panel to the inner walls of the cubes using small metal brackets and short screws to prevent shifting. Insert clear plastic drawer inserts into the upper cubes for easy makeup access, leaving the bottom cubes open for bulky items.
Pegboard Vertical Display Wall
Setup Method
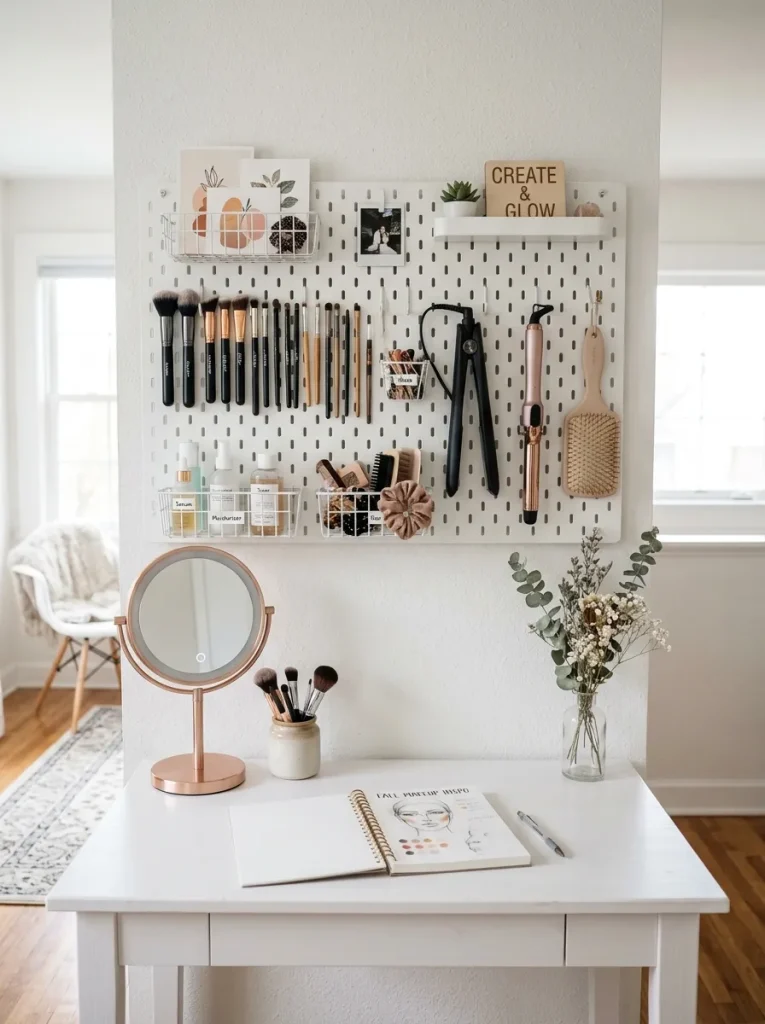
Pegboard cosmetic displays shift the entirety of your product organization off the desktop surface and onto a highly customizable vertical grid wall. This creative project utilizes heavy-duty wooden or metal pegboards mounted directly behind a simple table to keep tools visible and easily reachable. By using adjustable metal hooks, small hanging baskets, and clip-on shelves, you can rearrange your makeup storage layout instantly as your collection evolves. This setup is highly favored by beauty enthusiasts who prefer seeing their entire inventory clearly displayed rather than hidden away in deep drawers.
Purchase a sturdy white metal pegboard measuring twenty-four by thirty-six inches, along with a matching assortment of pegboard hooks and baskets. Hold the pegboard against the wall directly behind your existing vanity table and mark the four corner mounting holes clearly with a pencil. Drill pilot holes into the wall marks, tap plastic drywall anchors into place, and screw the pegboard securely to the wall using spacer washers. Arrange your custom assortment of hooks onto the pegboard grid to hang hair straighteners, curling irons, and jewelry items. Clip small plastic bins onto the lower pegs to hold makeup brushes vertically, keeping your desk surface completely empty and clean.
Glass Top Showcase Station
Step-by-Step Guide
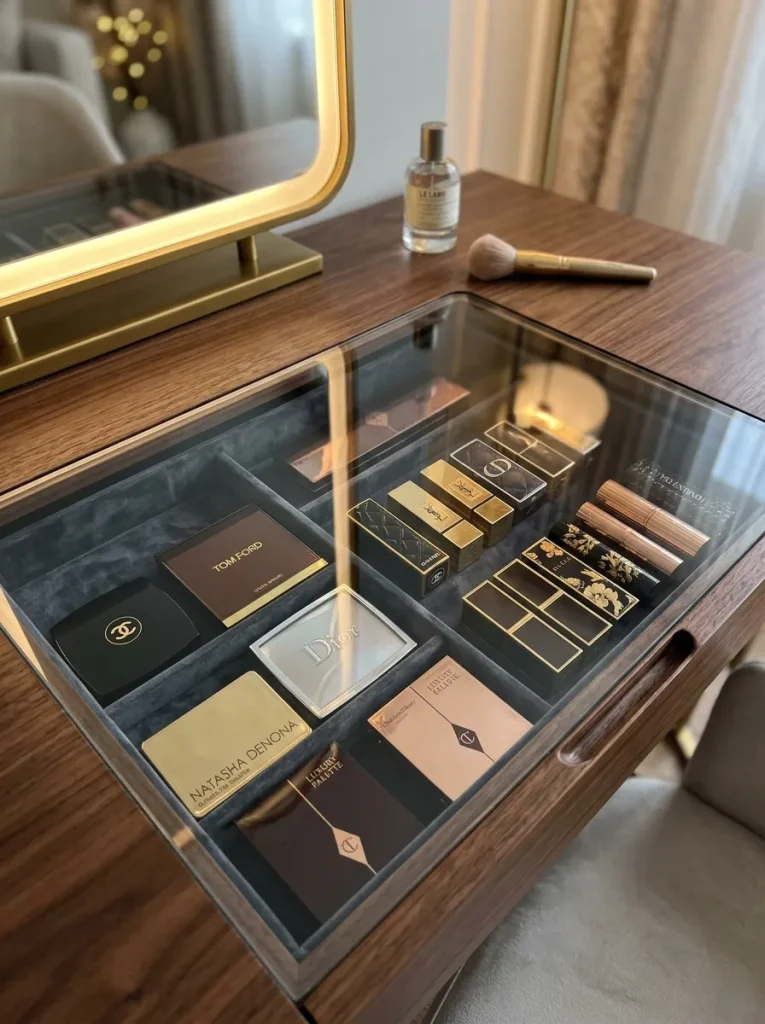
A glass top showcase station features a completely transparent viewing window built directly into the main desktop surface, exposing the shallow drawer beneath. This high-end layout replicates professional salon aesthetics and allows you to locate specific cosmetic items visually before ever opening a single drawer. The smooth glass surface is incredibly easy to clean, resisting permanent stains from loose pigment powders, liquid liners, or oily facial serums. It provides a highly organized, visually striking solution for displaying beautifully packaged beauty products and luxury perfume bottles.
Select a simple wooden console table that features a wide, shallow central drawer layout. Use a jigsaw to carefully cut out a large rectangular section from the center of the wooden desktop, leaving a solid three-inch border around the perimeter. Sand the cut inner edges smooth, then apply a thin layer of clear silicone sealant along the inside rim of the cutout. Drop a custom-cut piece of quarter-inch thick tempered glass directly into the sealed cutout, pressing down firmly until it sits perfectly flush with the wood. Line the shallow drawer underneath with black velvet fabric dividers, allowing your neatly arranged makeup collection to be viewed through the glass window.

Ladder Shelf Tiered Cosmetic Tower
How to Create
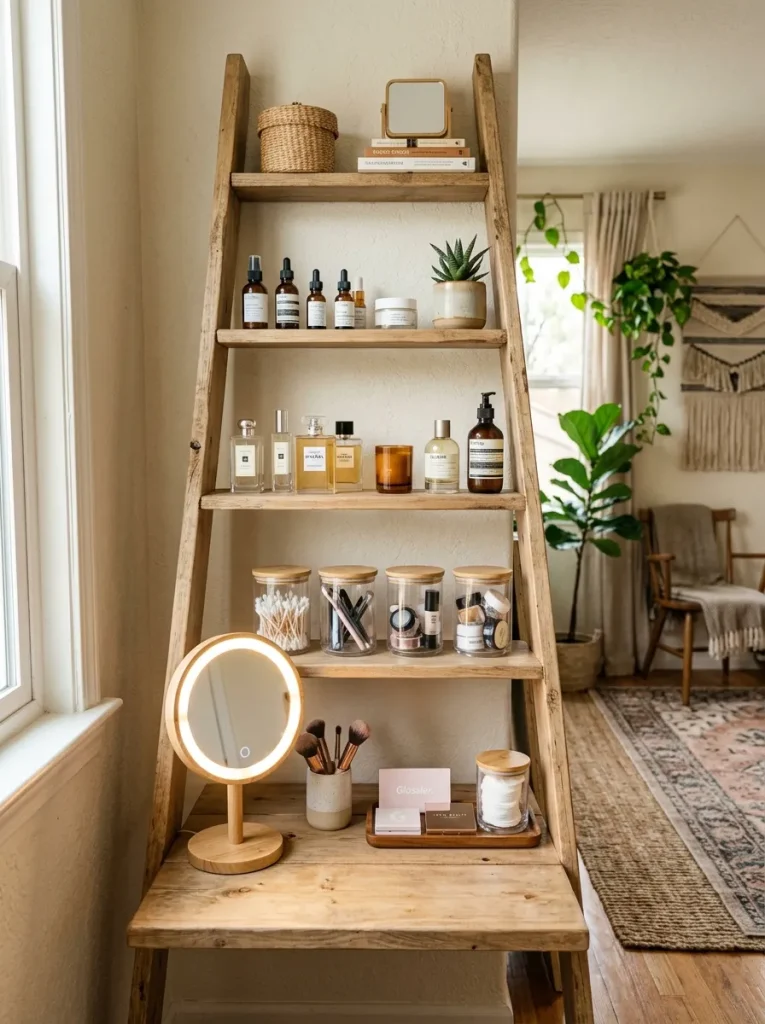
The ladder shelf cosmetic tower utilizes a leaning or A-frame ladder structure to create a terraced, multi-level beauty organization station. The deep bottom shelves serve as the main desktop area for mirror placement and product application, while the progressively narrower upper shelves hold decorative jars, cotton pads, and perfumes. This design possesses an excellent casual aesthetic that softens modern bedroom spaces while providing distinct zones for different categories of products. It is highly practical for renters because it requires minimal wall drilling to remain completely stable.
Select a solid wood five-tier leaning ladder shelf unit that features a deep bottom shelf measuring at least fifteen inches in depth. Assemble the ladder frame firmly, making sure all structural support screws are tightened down using an allen wrench. Place the ladder unit against your bedroom wall, using adhesive rubber bumper pads on the top contact points to prevent wall scuffs. Position your main freestanding lighted vanity mirror on the wide bottom shelf, which acts as your primary application desk. Use the second and third shelves to house matching fabric storage bins for hair tools and makeup palettes, leaving the top small shelves for decorative perfume bottles.
Hollywood Lighted Mirror Vanity Center
How to Make
The Hollywood vanity center focuses on maximizing illumination quality by surrounding a large vertical mirror with a continuous perimeter of bright LED bulbs. Proper lighting distribution is essential for accurate cosmetic application, as it eliminates harsh facial shadows caused by overhead bedroom ceiling fixtures. This classic dressing room design offers exceptional functionality and serves as a glamorous statement piece within large walk-in closets or bedroom suites. The inclusion of high-output bulbs brings a professional, studio-grade environment directly into your personal residence.
Acquire a large rectangular wood-framed mirror measuring approximately thirty inches wide by twenty-four inches high. Purchase a specialized kit of USB-powered stick-on LED vanity light bulbs that feature adjustable brightness and color temperature settings. Clean the mirror’s wooden frame thoroughly with rubbing alcohol to remove surface oils, ensuring a strong bond for the adhesive bulb backings. Space ten to twelve LED bulbs evenly around the perimeter of the frame, pressing the adhesive bases down firmly for thirty seconds each. Wrap and conceal the excess connecting wires neatly behind the mirror backboard, then place the completed lighted mirror onto a sleek, white minimalist desk.

Repurposed Bookshelf Side vanity
Execution Process
Repurposing a slim bookcase into a side-access vanity station is an ingenious space-saving solution ideal for narrow areas adjacent to beds or wardrobes. This layout involves removing several upper shelves to create an open cavity for a mirror, while utilizing the lower fixed shelves for heavy product storage. By turning the bookshelf sideways against a wall, you can create a private, semi-enclosed grooming station that takes up less than two feet of wall width. It is a highly creative project that reuses common household utility items effectively.
Obtain a standard three-shelf or five-shelf wooden bookcase measuring roughly twelve inches deep and twenty-four inches wide. Remove the adjustable upper shelves from the unit, leaving the main top frame and the bottom permanent shelves completely intact. Mount a rectangular mirror directly onto the interior back panel of the bookcase inside the newly created open upper cavity. Place a small, battery-operated LED light bar at the top underside of the bookcase frame to illuminate the interior mirror section. Utilize the remaining lower permanent shelves to hold large plastic organizer baskets for backup skincare products, hair dryers, and clean face towels.
Minimalist Wall-Mounted Flip Desk
Setup Method
The wall-mounted flip desk represents the ultimate space-saving design, featuring a hinged wooden cabinet that folds down to reveal a vanity station. When closed, the unit sits completely flat against the wall, appearing as a clean, unobtrusive cabinet that keeps cosmetics hidden away from sight. When lowered, the cabinet door transforms into a sturdy horizontal desktop surface supported by interior tension cables or folding wooden legs. This technical design is perfect for multi-functional spaces, guest bedrooms, or highly compact studio apartments.
Construct a shallow wooden box cabinet measuring twenty-four inches wide, eighteen inches high, and six inches deep using sturdy pine boards. Mount a compact mirror permanently to the inside back wall of the cabinet box using strong mirror adhesive. Attach the front cover panel to the bottom edge of the cabinet box using two heavy-duty brass piano hinges, allowing it to swing downward. Connect two braided steel restraint cables from the inside top corners of the box to the outer edges of the lid to stop it at a perfect ninety-degree angle. Mount the entire closed unit securely to wall studs using deep structural wood screws.
Common Beginner Mistakes and How to Avoid Them
One of the most frequent errors made during a cosmetic station DIY project is selecting lighting with an incorrect color rendering index or wrong color temperature. Installing warm yellow or cool blue bulbs alters how makeup colors appear on the skin, often resulting in unblended lines or over-applied products when you step outside into natural daylight. To completely avoid this issue, always choose LED bulbs labeled as natural daylight or calibrated to a color temperature of five thousand Kelvins. Another common mistake is mounting floating vanity shelves into weak drywall without using proper structural wall anchors or locating solid wooden studs. Over time, the weight of heavy mirrors, glass perfume bottles, and beauty tools will cause unanchored shelves to sag or pull completely out of the wall.
Additionally, beginners often fail to measure the clearance height required for their vanity chair or stool relative to the underside of the desk. This oversight leads to uncomfortable seating positions or prevents the chair from sliding neatly under the desk when the station is not in use. Always maintain a comfortable distance of ten to twelve inches between the seat top and the desktop bottom. Finally, neglecting to use stain-resistant coatings on wooden surfaces leads to permanent damage from cosmetic pigment spills. Always seal painted or stained wood with a clear, wipeable polyurethane topcoat to ensure easy cleanup.
Practical Tips for Better Results
To achieve professional-grade results with your handmade beauty station, storage organization and product accessibility must be structured systematically. Utilize clear acrylic dividers rather than opaque fabric bins inside your main makeup drawers; clear plastic allows light to pass through, making it simple to identify tiny eyeliner pencils and lip glosses instantly. Grouping your cosmetics chronologically based on your daily application routine prevents unnecessary searching and speeds up your morning schedule significantly.
| Organizer Type | Best Product Fit | Material Benefit | Space Efficiency |
|---|---|---|---|
| Clear Acrylic Tiered Trays | Lipsticks and Nail Polishes | High visibility, stain-resistant | Compact vertical stacking |
| Deep Plastic Bins | Hair Dryers and Curling Irons | Heavy-duty, conceals bulky cords | Maximizes deep drawer space |
| Shallow Grid Dividers | Eyeshadow Palettes and Powders | Prevents shifting, organizes flat items | Keeps drawer tops uniform |
| Hanging Pegboard Cups | Makeup Brushes and Sponges | Keeps bristles upright, airflow access | Frees up desktop surface |
When setting up your mirror, ensure the primary light source is positioned directly in front of your face rather than above or behind you. Side-angled or front-facing lighting distributes illumination evenly across your features, eliminating dark under-eye shadows and ensuring symmetrical cosmetic blending. If your vanity station is located in a dark corner of a bedroom away from windows, placing a large white poster board or light-colored rug underneath the desk helps bounce ambient light upward, further improving overall facial visibility.
Styling, Presentation, or Organization Ideas
Integrating a handmade cosmetic workspace seamlessly into your broader bedroom environment requires thoughtful styling choices that emphasize a clean aesthetic. To maintain a modern design feel, keep the main desktop surface as clear as possible by only displaying beautifully designed perfume bottles or a single jar of fresh flowers. Concealing messy electrical cords from hair straighteners and lighted mirrors is crucial for a polished presentation; use adhesive cord clips underneath the back edge of the table to route cables cleanly out of sight toward the wall outlet.
Consider coordinating the color palette of your organization bins with the accent tones present in your bedroom blankets, curtains, or pillows. For instance, using brushed brass organizer cups on a white desk adds an elegant, upscale touch that complements warm interior themes. If you use a large pegboard or floating shelves, arrange your items by bottle height to create clean visual lines that enhance overall home decor harmony. Placing a small, comfortable faux-fur stool or a sleek mid-century modern chair underneath the station adds immediate texture and warmth, transforming a basic utilitarian workspace into an inviting, stylish personal sanctuary.
Budget or Time Planning
Executing a customized beauty desk project efficiently requires a structured understanding of financial outlays and time management requirements. By utilizing budget ideas like transforming existing furniture or sourcing modular components, creators can build premium setups for a fraction of retail store costs. Allocating specific blocks of time to preparation, assembly, and drying phases prevents mistakes and keeps the project manageable.
- Phase 1: Dimensions and Sourcing (2 Hours): Measure bedroom spaces, locate wall studs, and purchase wood panels, hardware, and LED lights.
- Phase 2: Surface Preparation (2–3 Hours): Sand down old desk surfaces, apply primer, or cut custom wood shapes for corner configurations.
- Phase 3: Structural Assembly (1–2 Hours): Mount floating brackets to wall studs, assemble storage cubes, or attach heavy piano hinges to flip desks.
- Phase 4: Lighting and Organization (1 Hour): Apply stick-on LED bulbs to mirror frames, route power cables, and insert acrylic drawer dividers.
Purchasing multi-pack plastic organizer bins online is significantly cheaper than buying individual trays at specialty home decor shops. Splitting painting and mounting over a two-day weekend ensures that primers and protective topcoats dry completely before heavy cosmetic items are placed on the new surfaces.
Creative Expansion and Advanced Inspiration
Once you have mastered the foundational organization methods outlined in this tutorial, you can explore advanced variations that introduce high-tech utility to your beauty station. Consider installing hidden wireless charging pads directly beneath the wooden desktop surface, allowing your smartphone to charge automatically while sitting on the table during your morning routine. Another advanced upgrade involves routing internal electrical power strips inside a deep drawer, creating a dedicated, plugged-in home for hair dryers and curling irons that keeps cords hidden permanently.
You can also experiment with embedding architectural smart LED light strips around the rear perimeter of your vanity mirror to create a beautiful ambient halo backlighting effect controlled via a smartphone app. For large walk-in dressing rooms, try expanding the single desk concept into a full-scale beauty island featuring central glass showcase drawers and double-sided lighted mirrors for multi-person use. By continuously mixing tech integrations, premium material finishes, and advanced organizational layouts, you can evolve a basic handmade workspace into a sophisticated luxury dressing hub that enhances your home’s long-term value.