10 Book Nook Ideas DIY Forest
Integrating natural landscape themes into indoor bookshelves creates a refreshing and enchanting atmosphere during any season. A woodland shelf insert serves as a self-contained miniature wilderness that sits snugly between your favorite volumes, bringing forest storytelling directly to your living space. This detailed guide explores how to design, assemble, and illuminate miniature natural landscapes using simple, accessible crafting techniques. Readers will learn how to manipulate basic materials like high-density foam, preserved moss, real twigs, and miniature lights to construct realistic wilderness scenes. This creative project elevates standard home decor by blending a love for literature with organic aesthetics and botanical design elements. Whether you prefer a dense twilight pine woods or a mystical mossy fairy grove, these shelf inserts offer an engaging way to express natural beauty. Building these dioramas allows you to customize every tiny detail, from the texture of the forest floor to the hidden light filtering through a miniature canopy. By understanding the core principles of miniature construction, scale, and lighting placement, you can easily transform an empty shelf gap into a focal point of organic inspiration. This article provides a comprehensive tutorial for crafting ten distinct forest shelf inserts that will enhance your permanent home decorations.
Why Miniature Woodland Landscapes Are Highly Popular in Contemporary Design
Miniature woodland shelf inserts have captured the attention of DIY enthusiasts across visual discovery platforms, serving as high-interest Pinterest ideas for modern interior styling. The visual appeal lies in the unique combination of organic textures, forced perspective depth, and functional home decor application. These compact displays provide high visual impact without requiring significant physical space, making them ideal for apartments, offices, or packed study rooms. For beginners, a forest-themed miniature display is an exceptionally accessible entry point into diorama crafting because natural imagery is forgiving and easily scaled down using found objects. Basic elements such as real twigs, dried moss, fine sand, and warm copper fairy lights are readily available and simple to arrange effectively. Furthermore, building a handmade woodland scene offers a rewarding tactile experience that contrasts with mass-produced home ornaments. The ability to control the color palette, botanical styles, and lighting schemes ensures that the finished creative project aligns perfectly with your existing interior design, whether that is a sleek modern design or a rustic aesthetic. These projects turn static bookshelves into dynamic narratives that delight onlookers throughout the year.
Materials and Structural Selection for Miniature Forest Crafting
Constructing a durable and visually appealing forest shelf insert requires careful planning and gathering specific structural materials before starting assembly. The outer shell, or housing box, forms the foundation of your project and must be sturdy enough to support internal backdrops, heavy plaster contours, and wiring components. Solid chipboard, thick corrugated cardboard, or thin plywood sheets serve as excellent structural foundations for the main enclosure. For internal components, lightweight foam board is highly recommended because it is easy to cut, score, and layer to build rolling hills and rocky cliffs. To assemble the main structure securely, you will need high-tack PVA wood glue, hot glue sticks for rapid bonding, and double-sided spacer tape to create physical depth between tree layers. Illuminating the interior requires a reliable light source, such as a battery-operated LED fairy light strand with a thin, flexible copper wire that can be easily concealed behind trunks. Additional decorative supplies include acrylic craft paints, preserved sheet moss, faux foliage clusters, and natural twigs. Proper planning involves measuring the exact depth, height, and width of your bookshelf to ensure the finished insert slides smoothly between books without protruding.
Idea 1: The Deep Twilight Pine Woods
Design Concept and Spatial Layout
The twilight pine woods concept captures the serene mystery of a dense coniferous forest during the evening blue hour, using tall silhouettes and deep shadows. This design relies heavily on forced perspective, placing thicker, textured tree trunks at the front opening of the insert and tapering the tree sizes down toward a dark background panel to simulate an expansive wilderness path. The color palette focuses on midnight blues, deep forest greens, and charcoal grays, highlighted by a cool, low-contrast illumination scheme. Tiny pathways carved into the floor panel guide the eye deep into the center of the display.
Step-by-Step Guide
To build this streetscape, cut two side walls from sturdy foam board, tapering them slightly toward the back panel to create depth within the housing box. Paint the interior surfaces with a gradient of dark blue and black acrylic paint, blending the colors to simulate a distant evening sky. Construct the main pine trunks by wrapping real fallen twigs in brown floral tape to build realistic bark textures, then attach dark green faux conifer foliage to the upper branches. Fix the trees onto the floor panel using hot glue, ensuring the taller trees sit at the front sides and the smaller ones occupy the rear space. Weave a delicate strand of silver-wired cool white micro LED lights through the upper canopy, keeping the wires hidden behind the wooden trunks. Apply a thin layer of dark brown texture paste across the ground panel, pressing bits of dried moss and fine dirt into the mixture to form a realistic forest floor. Finally, slide the completed assembly into your outer housing box, checking that the front edges align perfectly with your bookshelf edge.

Idea 2: The Sun-Dappled Birch Grove
Design Concept and Spatial Layout
This design concept highlights the bright, airy elegance of a deciduous forest filled with slender white-barked birch trees and lush green ferns. The visual layout uses a straight perspective that mimics a natural clearing, allowing ample warm light to flood the central path from above. The aesthetic style relies on contrasting textures, featuring the smooth white bark of the birch trees against a rich floor covering of vibrant green mosses. The color scheme incorporates crisp whites, pale creams, emerald greens, and the golden glow of simulated morning sunshine filtering through leaves.
Execution Process
Begin by cutting the floor, back, and side panels from thick cardboard, then line the interior walls with a soft, light-green painted paper backdrop to represent distant foliage. Craft the distinctive birch tree trunks using smooth wooden dowels painted with a matte white base coat, using a fine-tipped black marker to add characteristic horizontal bark markings. Cut small pieces of light green sponge or cluster foliage and glue them to the upper tips of the dowels to form a light, airy summer canopy. Arrange the completed trunks in small clusters across the floor panel, leaving a clear, winding walkway through the middle of the grove. Install a warm yellow LED light strand along the top inside ceiling panel, pointing the bulbs downward to simulate bright sunbeams breaking through the overhead leaves. Cover the entire floor area with preserved green cushion moss, securing it with PVA glue, and place tiny sprigs of faux ferns along the bases of the white trunks. Assemble the outer shell, routing the battery switch to the rear exterior.

Idea 3: The Ancient Mystical Mossy Hollow
Design Concept and Spatial Layout
The mystical mossy hollow concept focuses on a dense, ancient forest interior that embodies old-world folklore, featuring giant gnarled roots and glowing mushrooms. The central focus of this miniature display is an oversized, twisted hollow tree trunk positioned over a bubbling forest stream bed. This layout uses an organic, asymmetrical arrangement where massive root structures wrap along the side walls, framing a mysterious, luminous cavern in the background. The aesthetic relies heavily on rich botanical textures, incorporating thick layers of moss, lichen, and small glowing elements.
How to Create
Construct the main interior walls using thick insulation foam board, carving deep crevices and rocky textures directly into the surface with a hobby knife. Form the massive gnarled tree roots by twisting aluminum foil into thick rope shapes, coating them in air-dry clay, and scoring bark lines before painting them dark brown. Fix these sculpted roots along the floor and side walls so they frame a central opening leading toward the back panel. Cut a winding river pathway into the foam base, painting it dark teal and filling it with clear epoxy resin or thick gloss gel to simulate clear forest water. Craft tiny mushrooms from white polymer clay, painting the caps bright red with white dots, and tuck them into the root crevices. Position several warm orange and green LED lights beneath the root overhangs to create an otherworldly, magical glow across the mossy floor. Cover the carved rock surfaces with blended green moss powder, then seal the entire project into its protective box frame.

Idea 4: The Autumnal Golden Leaf Pathway
Design Concept and Spatial Layout
This vibrant concept captures the changing of the seasons within a deciduous forest, focusing on the rich colors of falling autumn leaves. The layout features a long, winding dirt path that disappears behind a rocky curve, inviting the viewer to imagine walking deeper into the woods. The primary aesthetic driver is the warm, high-contrast color palette, which features brilliant oranges, fiery reds, deep burgundies, and golden yellows. The lighting is designed to mimic a late afternoon sunset, casting long, dramatic shadows through the changing forest canopy.
Setup Method
Prepare a sturdy structural enclosure box and paint the interior side walls a muted, warm brown tone to prevent bright cardboard backings from showing through. Cut a curving path out of a secondary piece of foam board and glue it to the floor panel to elevate the landscape contours naturally. Gather dried natural twigs and attach small pinches of orange and yellow scenic foam foliage to the branches to represent autumn maple trees. Affix these colorful trees securely into the foam base, allowing some bare branches to extend over the central winding path. Install a strand of warm amber LED lights along the lower side walls, pointing them horizontally across the path to create low-angle sunset illumination. Crush real dried autumn leaves into tiny flakes and scatter them thickly over the pathway and ground surface, securing them with a mist of diluted clear glue. Assemble the completed landscape into the main frame, ensuring all wiring remains hidden beneath the contoured floor layers.

Idea 5: The Foggy Redwood Cathedral
Design Concept and Spatial Layout
Inspired by the coastal forests of the Pacific Northwest, this concept replicates the scale of a redwood grove, utilizing extreme vertical lines to create a sense of awe. The design uses distinct structural layers, placing massive, wide tree trunks at the absolute front edges of the insert to frame the view, while much thinner trees recede into the distance. This multi-layered arrangement creates a dramatic sense of immense height within a shallow bookshelf space, making it a compelling creative project. The aesthetic style is dark and moody, using deep grays, misty whites, and muted earth tones.
How to Make
Cut two exceptionally wide half-cylinder shapes from thick foam pipe insulation to serve as the massive foreground redwood trunks, painting them with heavily textured dark brown and reddish acrylic paint. Line the inner back panel with a sheet of translucent vellum paper, painting a faint silhouette of distant tree lines on the reverse side to simulate a foggy atmosphere. Position smaller, thinner twig trunks between the massive foreground pillars and the vellum backdrop to establish distinct tiers of depth. Install a bright white LED light strand directly behind the translucent vellum back panel, allowing a diffused, foggy white light to glow forward into the scene. Apply a dense mixture of dark soil paste, tiny pebbles, and brown sheet moss across the floor panel to mimic the damp floor of a coastal rainforest. Assemble all components into the main frame, ensuring the front redwood pillars sit flush with the outer opening of the bookshelf insert.

Idea 6: The enchanted Fairy Light Willow Glade
Design Concept and Spatial Layout
This whimsical design showcases a secret forest glade dominated by a central weeping willow tree whose branches hang down like curtains. The viewpoint is from the edge of the clearing looking inward, requiring a circular emphasis in the layout and soft, fluid lines. The primary materials simulate delicate hanging foliage, mossy resting stones, and dozens of floating pinpricks of light that reveal a magical gathering space. The color scheme blends soft sage greens, pale emeralds, and the contrasting magical glow of multi-colored micro LED lights hanging from the branches.
Step-by-Step Guide
Cut a circular opening in a piece of foam board to serve as the central glade floor, painting the perimeter in deep earthy tones. Construct a large central willow tree trunk using twisted armature wire, wrapping the wire structure in brown clay or plaster gauze to create a realistic, weathered bark finish. Attach long strands of green embroidery floss or fine moss fibers to the willow branches, allowing them to drape downward toward the floor like weeping foliage. Wrap a specialized strand of micro-dot fairy lights around the wire branches, allowing the tiny bulbs to dangle among the hanging green threads like glowing fireflies. Place small, flat pebbles around the base of the tree to represent ancient standing stones, covering their tops with fine green flocking powder. Slide the completed willow structure into the center of the enclosure box, routing the wiring through the base panel to keep the display completely clean.
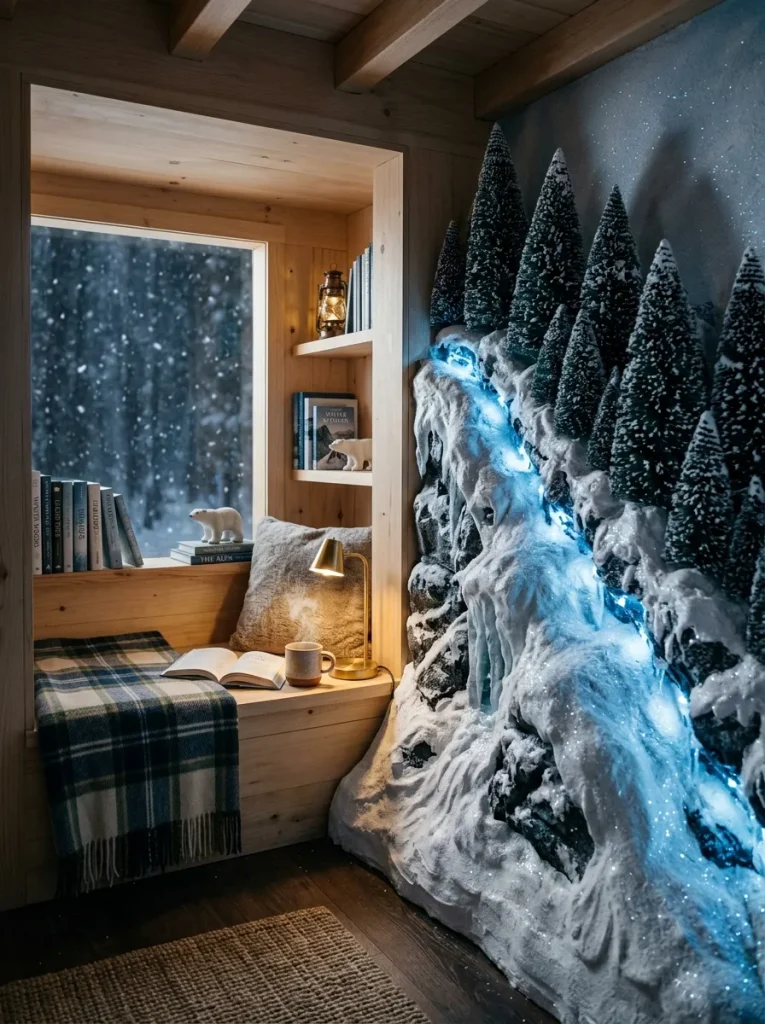
Idea 7: The Winter Alpine Pine Ridge
Design Concept and Spatial Layout
The winter alpine ridge concept shifts the focus to a frozen, high-altitude pine forest covered in heavy winter snow drifts. The architectural structure of this layout uses a steep, sloping hill that rises from the front corner toward the upper back corner, maximizing vertical space. The primary materials simulate heavy blankets of snow, frozen rocky ledges, and resilient evergreen trees that withstand winter weather. The color palette is strictly limited to stark whites, cool ice blues, and deep forest greens, creating a clean minimalist style that fits modern winter decor.
Execution Process
Cut several triangular wedge shapes from thick white insulation foam and stack them inside the box to form a steep, sloping hillside ridge. Coat the entire foam slope with a thick layer of structural modeling paste or spackling compound, sculpting realistic snow drifts and frozen snow banks with a small palette knife. Select a collection of dark green bottle brush trees, trimming their shapes into realistic pines, and coat their branch tips with white acrylic paint to simulate heavy snow accumulation. Plant these winter trees firmly along the sloping ridge, grouping them closer together near the top of the hill to create a dense treeline look. Thread a cool blue LED light strand low along the snow drifts, allowing the icy light to reflect upward off the white sculpted surfaces. Dust the entire interior with fine iridescent glitter while the structural paste is wet to give the finished snow a realistic, glistening ice appearance.

Idea 8: The Bamboo Forest Path
Design Concept and Spatial Layout
This design honors the minimalist elegance of eastern woodlands by depicting a dense bamboo forest intersected by a clean stone walkway. The layout focuses on repetitive vertical lines, using hundreds of thin, straight green stalks packed closely together along the side panels. This configuration creates a unique tunneling effect, drawing the viewer’s eye down the straight central path toward a glowing stone lantern at the far end. The aesthetic is peaceful, clean, and structured, utilizing vibrant light greens, soft tans, and slate grays to achieve a modern design.
How to Make
Construct the inner forest walls from dark green cardstock, providing a solid, colorful background for the dense bamboo stalks. Replicate the bamboo stalks by cutting thin natural wooden skewers or dried reeds into matching lengths, painting them with a vibrant satin green acrylic wash. Use a fine brush to paint small tan bands at regular intervals along the green skewers to represent the characteristic structural nodes of real bamboo. Arrange these painted stalks vertically in dense, overlapping rows along both side walls, securing them with strong wood glue. Lay a pathway down the center of the floor panel using small, flat pieces of slate gray cardstock or real thin pebbles to mimic a flagstone walkway. Place a tiny, hand-sculpted stone lantern made from gray polymer clay at the end of the path, hiding a single warm yellow LED inside it to light the walkway.

Idea 9: The Sunken Forest River Canyon
Design Concept and Spatial Layout
This dynamic concept showcases a dramatic forest canyon where a rushing river cuts deeply through steep, rocky cliffs lined with overhanging trees. The layout is split vertically, with the lower third representing a glowing canyon riverbed and the upper two-thirds featuring steep mossy cliffs and leaning trees. This design relies on strong vertical framing and strategic layering to create a sense of extreme geographical depth within a compact space. The color scheme incorporates deep slate grays, earthy browns, vibrant aqua blues, and bright forest greens, creating a stunning visual contrast.
Execution Process
Cut two matching, jagged cliff faces out of thick expanded polystyrene foam, texturing the surfaces with a wire brush to simulate rough, weathered canyon stone. Paint the carved foam cliffs with a base coat of dark gray, adding light gray dry brushing over the raised edges to highlight the rocky textures. Glue these cliff structures along the interior side walls of the insert box, leaving a deep, narrow canyon gap running down the center floor. Paint the bottom of the canyon gap with a bright gradient of turquoise and deep blue acrylic paint to represent a moving wilderness river. Install a waterproof or well-insulated blue LED light strand along the riverbed, covering the bulbs with clear glossy glass beads or clear casting resin to create a fluid water effect. Fix small natural twigs with green foliage along the tops of the foam cliffs so they lean dramatically over the canyon river below.
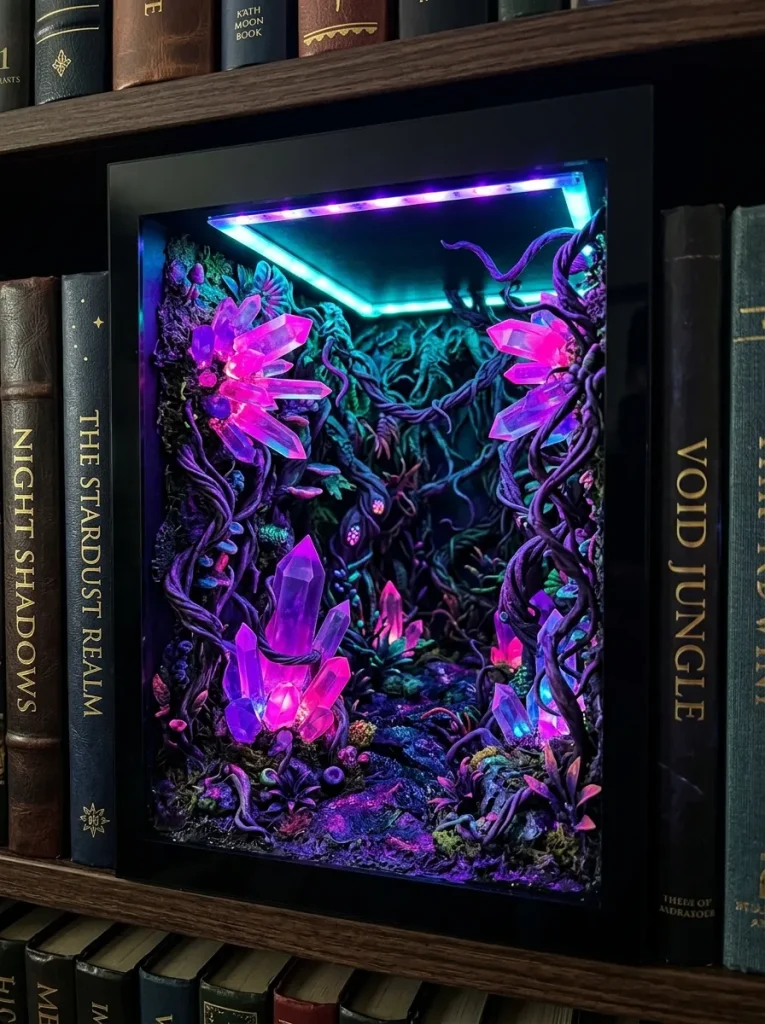
Idea 10: The Fantasy Luminescent Crystal Jungle
Design Concept and Spatial Layout
This imaginative concept departs from realistic landscapes to explore a magical fantasy jungle filled with giant glowing crystals and alien flora. Instead of standard green trees, this design uses surreal plant shapes, neon color palettes, and hidden ultraviolet or colored lighting to create an otherworldly environment. The layout features sharp, geometric crystal clusters erupting from a dark, iridescent forest floor, surrounded by twisted fantasy vines. The color palette is vibrant and rich, utilizing electric purples, neon pinks, deep magentas, and glowing cyan blues to deliver a captivating aesthetic.
How to Create
Line the interior walls of your structural box with matte black cardstock to ensure the vibrant, luminescent colors pop with maximum visual contrast. Sculpt several geometric crystal clusters out of clear hot glue sticks or translucent plastic acrylic shards, smoothing the faces with a hobby knife. Paint the bases of these custom plastic crystals with translucent neon pink and purple inks, allowing light to still pass through the main bodies. Arrange the handmade crystal clusters across the floor panel, weaving twisted purple yarn or clay vines around their bases to represent exotic fantasy jungle growth. Install a small strip of purple or ultraviolet LED lights along the upper inside ceiling panel, pointing the light downward to make the neon elements fluoresce. Cover the surrounding ground surface with dark purple flocking powder or fine black sand to complete the alien jungle floor presentation before sealing the unit.

Common Beginner Mistakes and How to Avoid Them
| Crafting Mistake | Potential Visual or Structural Impact | Preventative Action & Solution |
|---|---|---|
| Using Wet Natural Materials | Development of mold, decay, and unpleasant odors trapped inside the sealed enclosure. | Only use properly preserved moss, kiln-dried twigs, and completely dry soil elements in your diorama construction. |
| Neglecting Scale Consistency | The scene looks unconvincing and disorganized due to conflicting component sizes. | Establish a fixed miniature scale beforehand and continuously check new items against your primary tree trunks. |
| Trapping the Power Switch | Inability to turn lights on or off without physically damaging the completed structure. | Design a dedicated back hatch or route the battery pack wiring to the exterior rear of the box before gluing panels. |
| Excessive Hot Glue Strings | Web-like plastic residue ruins the neat, organic appearance of the miniature forest foliage. | Use a heat gun or a hair dryer on a low setting after assembly to instantly melt away fine plastic hot glue strands. |
Practical Tips for Better Botanical Diorama Results
Achieving a professional, high-end finish on your handmade forest shelf insert involves mastering a few specific assembly and texturing techniques. When cutting your structural foam board or thick cardboard panels, always use a fresh, sharp utility knife blade and a metal straightedge to ensure perfectly square joints during final frame assembly. To create the illusion of a forest that stretches on indefinitely, consider mounting a small, high-quality mirror against the rear back panel at a slight angle. This angled mirror reflects the side tree rows, creating an optical illusion that makes a short eight-inch box look like an expansive wilderness path. When applying preserved sheet moss to your landscapes, tear the moss into tiny, irregular fragments rather than gluing down large, flat chunks; this simple step builds a more realistic, contoured ground texture that mimics natural forest terrain. Additionally, utilize a fine mist of matte clear sealant spray over your finished organic elements to lock down loose flocking powder and preserve color vibrancy over time.
Styling, Presentation, and Bookshelf Organization
Once your woodland shelf insert is completely assembled and illuminated, strategic placement within your home library maximizes its visual appeal and complements your existing decorations. Position the completed creative project at eye level on an open shelf, ideally placing it between heavy, dark leather-bound books or classic literature volumes to form a strong visual frame. Grouping your books neatly on either side of the insert helps anchor the miniature world, drawing immediate attention to the glowing forest opening. Ensure that the front face of the diorama sits perfectly flush with the spines of the adjacent books to maintain a clean, integrated appearance along your shelving unit. If your design includes an external battery pack, conceal it neatly behind the books on the side, ensuring the power switch remains easily accessible without needing to pull the entire box structure out. You can further enhance the presentation by placing small potted succulents or air plants on the shelf above the insert, bridging the gap between the miniature forest inside and the large-scale decor of the room.
Efficient Budget and Time Planning
Completing a detailed forest shelf insert can be achieved economically and quickly by utilizing a structured planning approach and sourcing materials resourcefully. A standard single-cavity woodland diorama requires relatively few store-bought supplies, making it an excellent beginner friendly DIY project that can be completed over a single weekend. Dedicate your first afternoon session entirely to gathering tools, cutting the structural panels, assembling the outer housing box, and painting the background sky gradients. Allow the structural glues and base paint layers to dry completely overnight to avoid warping issues later in the assembly process. Dedicate the second day to crafting the individual tree trunks, wiring the micro LED light strands, gluing down the moss textures, and executing the final detailing steps. By sourcing free natural components like dry twigs, fallen bark pieces, and small pebbles from your backyard, you can build a highly durable home decor feature while keeping your financial planning within a minimal budget.
Creative Expansion and Advanced Inspiration
For experienced builders who wish to advance their miniature crafting skills, these basic forest designs can serve as foundations for complex environmental art installations. You can expand a standard single-cavity design by connecting multiple adjacent shelf inserts together to create a continuous, multi-panel woodland panoramic display across an entire shelf layer. Consider integrating smart-home technology into your built-in units, such as installing mini motion sensors that automatically activate the internal forest lights whenever someone approaches the bookshelf. Another advanced option involves incorporating a small, ultra-sonic water misting module inside your river or foggy canyon designs, producing real, rolling fog that drifts across the miniature mossy banks. You can also experiment with casting complex waterfall structures using clear two-part polyurethane resins tinted with alcohol inks to capture the movement of rushing wilderness water. These technical upgrades transform simple handmade frames into sophisticated, highly automated pieces of living art that permanently optimize your home’s aesthetic appeal.