10 Garage Storage Ideas Ceiling
The ceiling is the single largest underutilized storage asset in any residential garage. When walls and floor spaces reach capacity with workbenches, tool chests, and parked vehicles, looking upward unlocks hundreds of cubic feet of usable storage.
Mastering ceiling storage requires structural awareness, weight-distribution engineering, and vertical zoning. By combining heavy-gauge steel stationary racks, channel-track tote glides, automated motorized lifts, and kayak pulley hoists, you can store bulky, seasonal, and low-frequency items out of sight while keeping floor bays completely clear.
Why This Idea Is Trending & Flattering
-
Reclaims 100% of Usable Floor Area: Lifts bulky holiday totes, camping gear, and sports equipment overhead so vehicles fit comfortably without door dings.
-
Capitalizes on Dead Vertical Airspace: Utilizes the unused 2- to 4-foot void above garage door tracks and open joists that standard shelving cannot reach.
-
Protects Gear from Flood & Moisture: Elevates cardboard boxes, fabric tents, and tools above wet winter snowmelt, floor spills, and ground pests.
-
Heavy Weight Capacities: Engineered steel ceiling racks and joist-anchored brackets safely support up to 600–800 lbs of distributed payload.
-
Effortless Single-Person Access: Motorized hoists and sliding rail tracks allow quick loading and unloading without risking ladder falls.
Weight Ratings, Joist Engineering & Safety Foundation Guide
Structural Framing & Joist Fastening Rules
-
Joist Span & Direction: Always locate solid timber ceiling joists (or engineered I-joists) using a deep-scan stud finder. Brackets must run perpendicular across multiple joists to distribute point loads safely.
-
Structural Fasteners: Strictly use 5/16-inch $times$ 3-inch or 3.5-inch structural lag screws with flat washers. Never rely on drywall anchors or standard drywall screws for overhead loads.
-
Drywall Allowance: When joists are covered by 1/2-inch or 5/8-inch drywall, ensure lag bolts penetrate at least 2 to 2.5 inches into solid wood joist meat.
Clearances & Spatial Zoning
-
Garage Door Tracks: Maintain at least 2 to 4 inches of clearance above the highest point of garage door travel and motor opener mechanisms.
-
Walkway Clearances: Maintain a minimum 7-foot headroom clearance beneath racks in pedestrian walkways. Lower clearance (e.g., down to 6 feet) is acceptable only directly above the hood of parked vehicles.
1. The Heavy-Duty $4times8text{-Foot}$ Steel Grid Overhead Rack

Concept Overview & Structural Design
A high-capacity stationary steel platform suspended from adjustable vertical drop down-rods, capable of holding up to 600 lbs of large storage totes and storage containers.
Step-by-Step Installation Blueprint
-
Locate ceiling joists and snap two chalk lines matching the $4times8text{-foot}$ rack footprint.
-
Bolt four ceiling angle brackets across two or three separate ceiling joists using 5/16-inch structural lag bolts.
-
Attach heavy-gauge vertical drop posts, adjusting them between 18 and 36 inches to align with desired overhead clearance.
-
Assemble the outer perimeter steel frame and drop in heavy wire grid decking panels.
-
Distribute weight evenly across the platform, placing the heaviest plastic totes over the center perimeter frame.
Pro Engineering Tip
Anchor ceiling brackets across multiple adjacent joists rather than inline along a single joist to distribute the downward tensile load across the roof truss system.
2. Motorized Cable-Lift Storage Platform with Wall Switch
Concept Overview & Structural Design
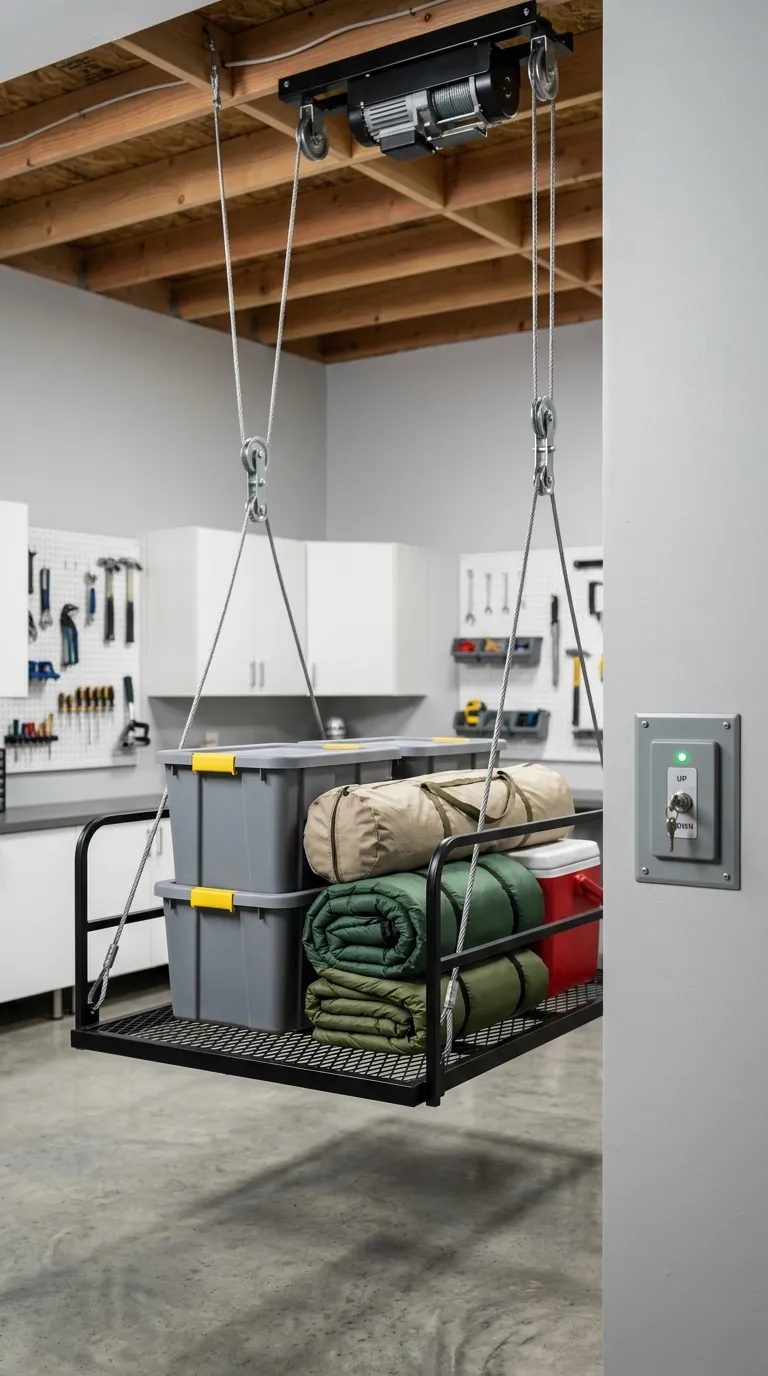
An electric motorized hoist platform that lowers to waist height for loading and rises to the ceiling with the push of a button or smartphone app, eliminating ladder climbing.
Step-by-Step Installation Blueprint
-
Mount an electric planetary-gear winch motor centered between solid ceiling joists.
-
Install heavy-duty pulley brackets at four ceiling corner points directly above the $4times4text{-foot}$ or $4times8text{-foot}$ steel platform.
-
Route high-tensile aircraft steel cables from the motorized drum through pulleys down to platform corner clips.
-
Wire the keyed wall controller or connect the smart control hub to a dedicated 120V outlet.
-
Test the auto-stop limit switches at both the top ceiling docking position and the bottom floor loading height.
Pro Engineering Tip
Choose motorized lifts equipped with internal mechanical worm gears or auto-locking safety brakes that prevent the platform from falling even during an electrical power outage.
3. Ceiling-Mounted Sliding Tote Track Channel Rails
Concept Overview & Structural Design
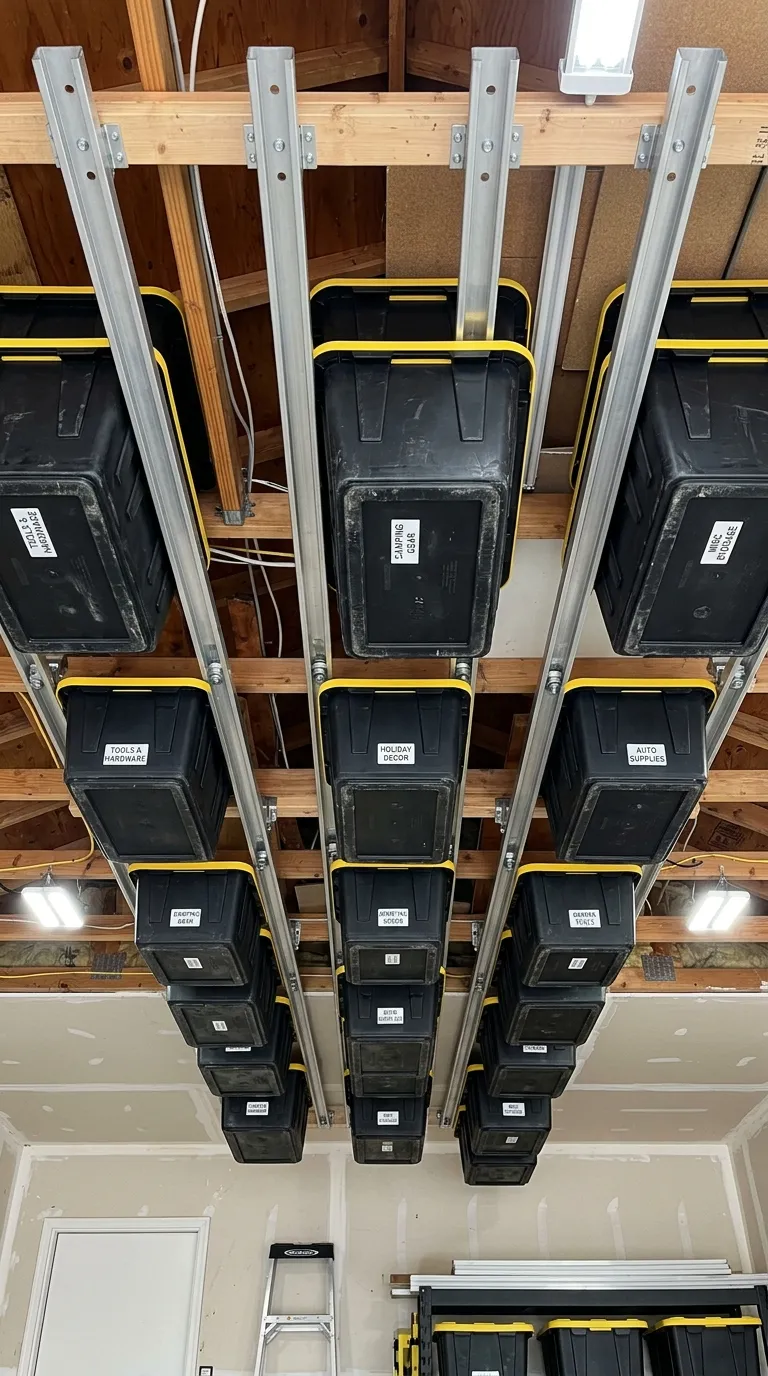
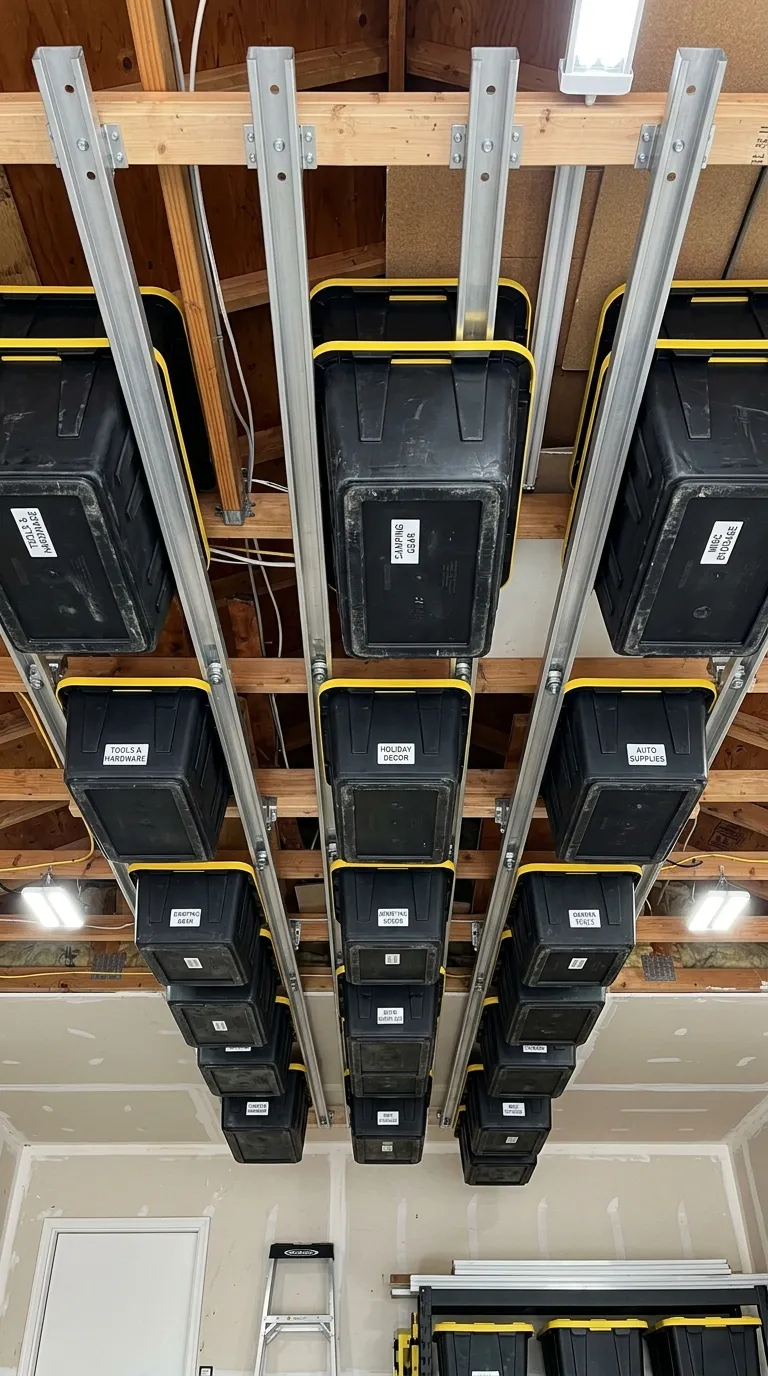
An engineered aluminum or powder-coated steel channel system that grips the molded plastic rims of heavy-duty storage totes, allowing them to slide in and out like ceiling drawers.
Step-by-Step Installation Blueprint
-
Purchase heavy-duty 27-gallon plastic storage totes with thick, reinforced rim lips (e.g., yellow-and-black Commander totes).
-
Measure the exact width of the tote rim; mount dual C-channel steel rails to ceiling joists spaced to cradle the outer lip.
-
Secure rail tracks with 3-inch lag screws into every intersecting ceiling joist.
-
Slide totes sequentially into the ceiling track channels from the front opening.
-
Install a safety pin or locking stop bolt at the front of each channel to prevent totes from vibrating forward when garage doors open.
Pro Engineering Tip
Label the bottom faces of all opaque totes with large high-contrast vinyl lettering so contents can be identified from the floor without pulling bins down.
4. Above-Garage-Door Low-Profile Storage Shelf
Concept Overview & Structural Design
A shallow 12- to 18-inch deep overhead shelf installed strictly in the dead air space between the ceiling and open roll-up garage door tracks.
Step-by-Step Installation Blueprint
-
Open the garage door fully to identify the highest point of travel and measure the remaining vertical ceiling gap.
-
If a gap of 14 to 24 inches exists, install low-profile horizontal steel brackets into the ceiling framing above the door tracks.
-
Drop in a long, shallow $2times8text{-foot}$ wire mesh or plywood deck.
-
Use this zone specifically for long, flat items: artificial Christmas trees, folding tables, camping awnings, and snow skis.
-
Ensure no cords or straps hang beneath the wire rack that could snag moving garage door rollers.
Pro Engineering Tip
Check clearance with the garage door in motion before loading; torsion springs and door cables must remain completely unobstructed throughout the full cycle.
5. Multi-Bike Pulley Hoist System with Mechanical Brake

Concept Overview & Structural Design
A mechanical 4:1 mechanical-advantage rope pulley system designed to hoist heavy mountain bikes, road bikes, and e-bikes up to the ceiling by their handlebars and seat.
Step-by-Step Installation Blueprint
-
Fasten two pulley brackets to a $2times4$ timber backing board mounted across ceiling joists, spaced to match the bike wheelbase (approx. 36–48 inches).
-
Thread heavy-duty paracord rope through the auto-locking cam brake mechanism and dual lifting pulleys.
-
Attach vinyl-coated lifting hooks under the bike handlebars and rear bicycle saddle.
-
Pull the hoist cord smoothly to raise the bike toward the ceiling; the auto-locking brake locks the line if tension is released.
-
Tie off excess rope around a wall-mounted metal cleat.
Pro Engineering Tip
For heavy electric bikes ($50+text{ lbs}$), remove the battery pack before hoisting to reduce strain on the pulley ropes and ceiling brackets.
6. Kayak, Canoe & Paddleboard Dual-Strap Ceiling Cradle

Concept Overview & Structural Design
A heavy-duty suspended webbing cradle system that holds long watercraft flat against the ceiling rafters above vehicle bays.
Step-by-Step Installation Blueprint
-
Install two heavy-duty ceiling bracket plates into joists spaced roughly one-third of the watercraft’s total length apart.
-
Thread wide, 2-inch marine-grade polyester webbing straps through ceiling-mounted D-rings and quick-release cam buckles.
-
Back the vehicle into the garage, drop the straps, slide the kayak through the loops, and cinch straps tight against the hull.
-
For larger canoes, integrate a dual-line rope hoist to raise both ends simultaneously with one pull rope.
-
Store kayaks hull-side up or on their side to distribute pressure evenly and prevent plastic hull warping.
Pro Engineering Tip
Never hang kayaks by their end carry-handles alone; supporting the hull with wide 2-inch belly straps prevents long-term stress deformation in fiberglass and polyethylene hulls.
7. Custom Reclaimed Timber Overhead Loft Mezzanine

Concept Overview & Structural Design
A permanent built-in architectural timber storage platform framed from $2times6$ lumber and structural plywood, designed for deep garages with 10- to 12-foot ceilings.
Step-by-Step Installation Blueprint
-
Anchor a structural $2times6$ ledger board to the rear garage wall studs using 1/2-inch lag screws every 16 inches.
-
Extend $2times6$ floor joists spaced 16 inches on center 4 to 6 feet out from the back wall, securing with galvanized joist hangers.
-
Support the front edge beam with 1/2-inch threaded steel rods anchored to ceiling rafters or vertical timber corner posts.
-
Deck the platform with 3/4-inch tongue-and-groove CDX structural plywood screwed down every 8 inches.
-
Add a 4-inch raised toe-kick safety lip along the outer perimeter to prevent items from sliding off the edge.
Pro Engineering Tip
A 4-inch raised perimeter lip is a mandatory safety feature; it stops round objects and bins from rolling off the platform onto vehicles or people below.
8. Suspended Overhead Extension Ladder Drop-In Racks
Concept Overview & Structural Design
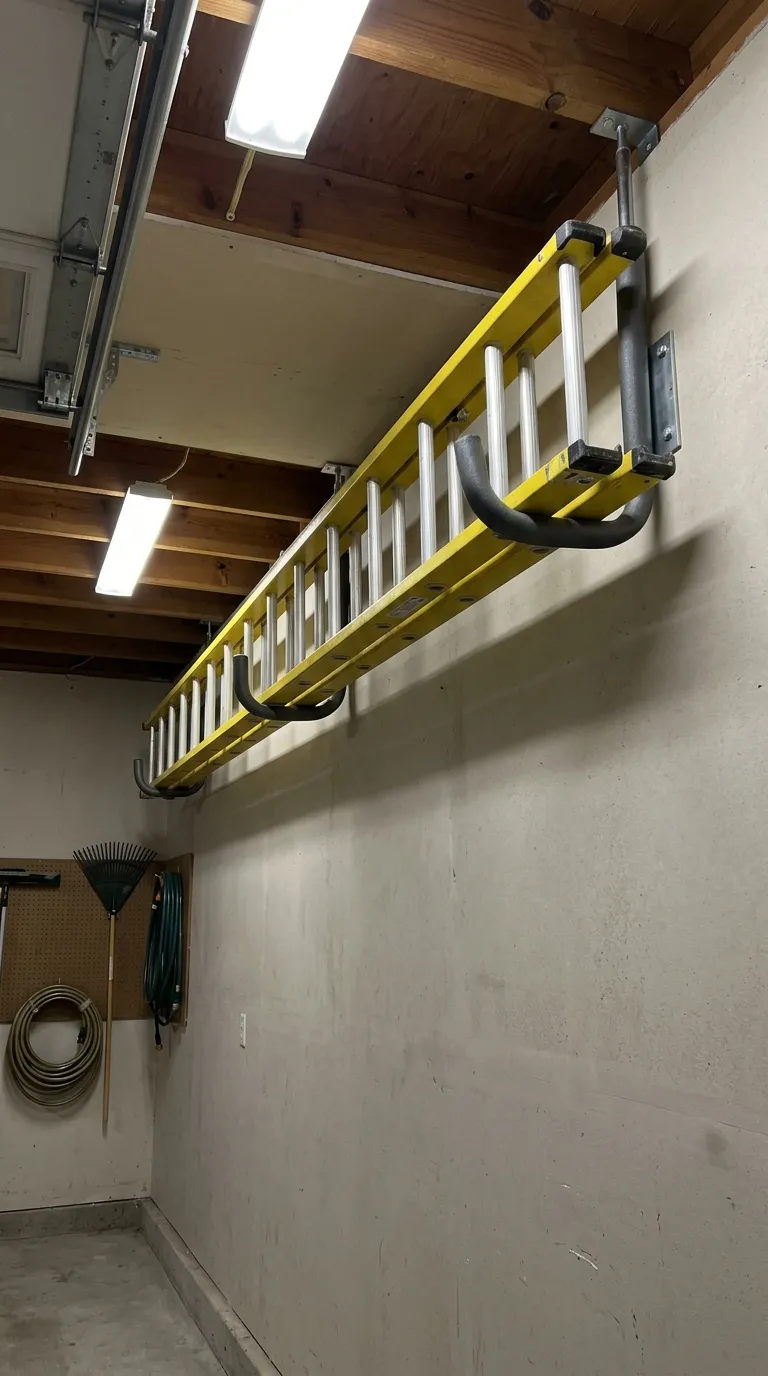
A set of parallel heavy-gauge steel J-hooks or custom Unistrut hangers that cradle long 24- to 32-foot aluminum extension ladders flat against the ceiling perimeter.
Step-by-Step Installation Blueprint
-
Mount two heavy-duty steel ladder ceiling hooks into joists along an unused perimeter ceiling edge, spaced 6 to 8 feet apart.
-
Ensure hooks feature a padded foam or rubberized sleeve to prevent metal-on-metal rattling.
-
Lift the extension ladder and slide one end into the rear cradle hook, then swing the front end into the forward hook.
-
Secure with a heavy-duty velcro strap or safety bungee across the open cradle mouth.
-
Enjoy instant floor and wall clearance along the garage sides.
Pro Engineering Tip
Mount ladder racks parallel to the side garage wall rather than in the center of the ceiling to keep ladder loading and unloading straightforward.
9. Longitudinal PVC Conduit & Timber Lumber Ceiling Loft
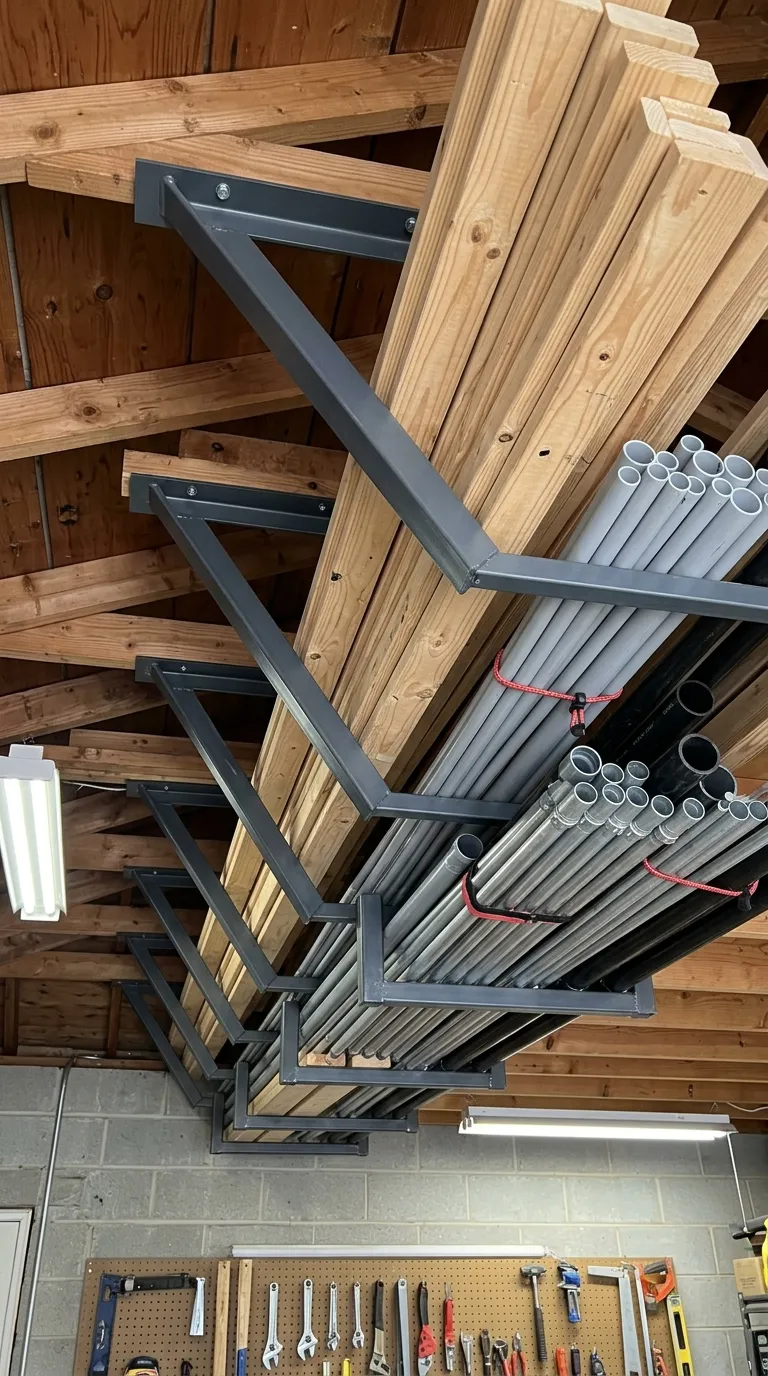
Concept Overview & Structural Design
A multi-tier suspended steel or pipe rack designed to store 10- to 16-foot lengths of building lumber, PVC pipes, copper tubing, and molding trim overhead.
Step-by-Step Installation Blueprint
-
Assemble three to four triangular drop-brackets using 1-inch galvanized steel plumbing pipes or welded Unistrut channel steel.
-
Fasten brackets into ceiling joists running in a straight line spaced 4 feet apart.
-
Create two to three horizontal tiers of support arms extending from the vertical drop pipes.
-
Slide long molding trim, 2×4 lumber boards, and PVC pipes horizontally into the support tiers.
-
Group smaller pipe trim inside 4-inch PVC drainage tubes placed on the racks for organized containment.
Pro Engineering Tip
Supporting long lumber at 4-foot intervals prevents flexible wood moldings and PVC conduit from sagging and warping over time.
10. Heavy-Duty Unistrut Modular Ceiling Channel Grid
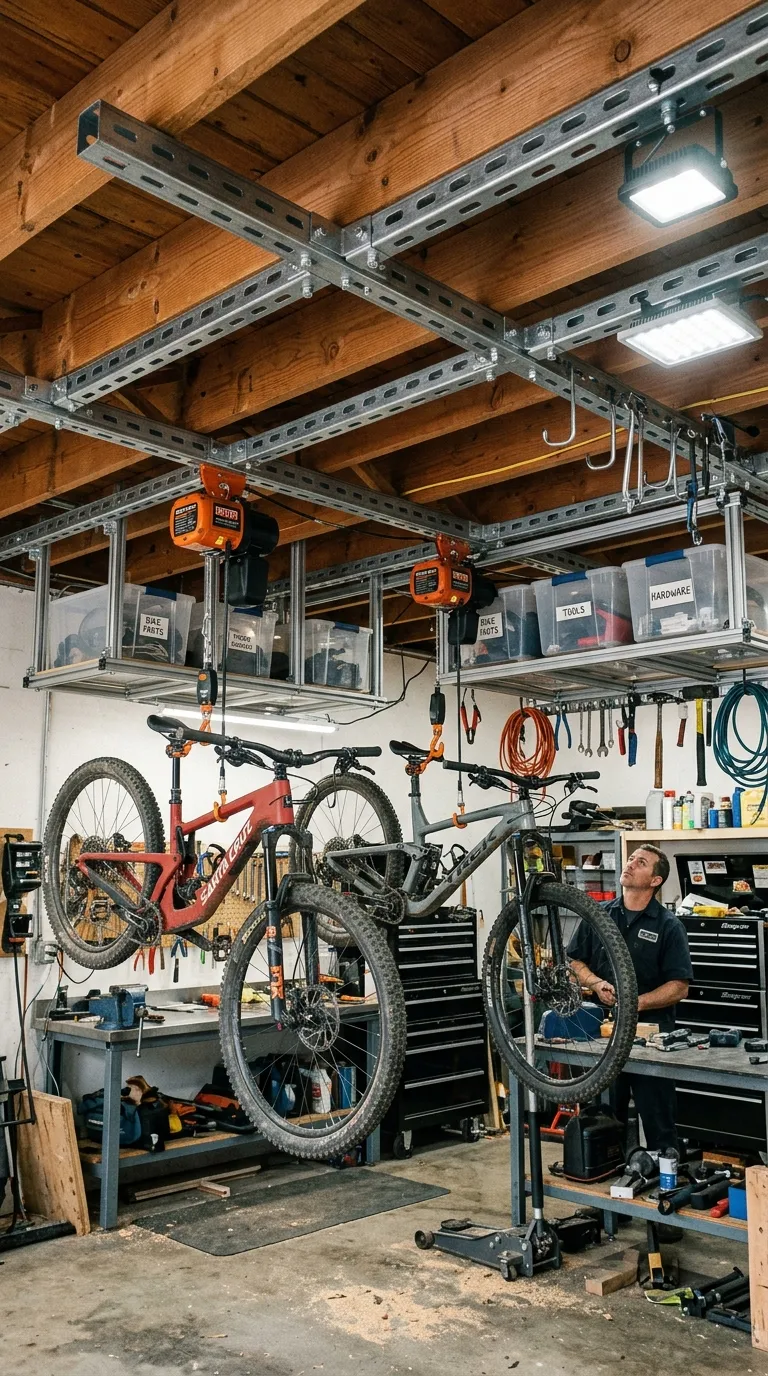
Concept Overview & Structural Design
A commercial-grade modular channel grid constructed from 1-5/8-inch slotted steel Unistrut channels, providing an infinitely adjustable ceiling anchor system.
Step-by-Step Installation Blueprint
-
Bolt three parallel 10-foot lengths of 12-gauge slotted steel Unistrut channel across ceiling joists spaced 4 feet apart.
-
Fasten with 3/8-inch lag screws and heavy fender washers into every intersecting ceiling joist.
-
Use spring-loaded Unistrut channel nuts to slide and lock threaded rod drops, eye bolts, and heavy utility hooks anywhere along the channel length.
-
Attach interchangeable storage platforms, hoist pulleys, or tool hangers that can be reconfigured in minutes without drilling new holes into joists.
-
Paint channels to match the ceiling or leave in hot-dipped galvanized finish for an industrial shop look.
Pro Engineering Tip
Unistrut channels turn your ceiling into a modular grid, allowing you to slide and re-space overhead racks whenever you change vehicles or storage layouts.
Ceiling Storage Concept & Structural Comparison
| Ceiling Storage Idea | Weight Capacity | Primary Mechanism | Best Overhead Location | Best Stored Items |
| $4times8$ Steel Rack | $600text{–}800text{ lbs}$ | Fixed Drop-Posts | Above Parked Car Hood | Seasonal Plastic Totes |
| Motorized Lift | $300text{–}500text{ lbs}$ | Electric Motor Winch | Open Ceiling Center | Heavy Boxes / Generators |
| Sliding Tote Tracks | $200text{–}350text{ lbs}$ | Rim-Gripping Rails | Center Walkway / Side | 27-Gallon Plastic Totes |
| Above-Door Shelf | $150text{–}250text{ lbs}$ | Low-Profile Brackets | Above Garage Door | Holiday Trees / Skis |
| Bike Pulley Hoist | $50text{–}100text{ lbs}$ | 4:1 Rope Pulley | Perimeter / Back Corner | Road, Mountain & E-Bikes |
| Kayak Webbing Cradle | $100text{–}150text{ lbs}$ | Wide Straps / Buckles | Above Vehicle Bay | Kayaks / Canoes / SUPs |
| Timber Mezzanine | $800text{–}1200text{ lbs}$ | $2times6$ Timber Frame | Back Wall Perimeter | Bulky Luggage & Furniture |
| Ladder J-Hooks | $75text{–}100text{ lbs}$ | Padded Steel Hooks | Side Wall Ceiling Line | Extension & Step Ladders |
| Pipe / Lumber Loft | $300text{–}450text{ lbs}$ | Multi-Tier Pipe Arms | Long Side Wall Edge | 10–16ft Lumber & PVC |
| Modular Unistrut | $1000+text{ lbs}$ Total | Slotted Channel Grid | Full Ceiling Span | Multi-Hoist & Rack Systems |
Common Ceiling Storage Mistakes & How to Avoid Them
-
Lagging into Drywall Instead of Solid Joists: Screwing structural brackets into drywall or missing the center of joists leads to catastrophic ceiling collapses. Solution: Use a deep-scan center-finding stud finder and pre-drill small pilot holes to verify solid wood meat before driving 5/16-inch structural lag screws.
-
Exceeding Garage Roof Truss Capacities: Overloading light pre-engineered residential roof trusses with thousands of pounds causes roof sagging. Solution: Keep total overhead storage loads under 600–800 lbs per bay, distributing weight across multiple trusses.
-
Obstructing Emergency Garage Door Sensors & Openers: Placing drop-posts too close to garage door tracks blocks safety eye sensors and catches door cables. Solution: Maintain at least 3 to 4 inches of clearance around all moving door hardware and safety sensors.
-
Storing Extreme Temperature-Sensitive Items Overhead: Garage ceiling temperatures can exceed 120°F (49°C) in summer. Solution: Never store batteries, flammable chemicals, aerosol cans, latex paints, or delicate heirloom electronics in overhead ceiling racks.