10 Frame Layouts For Walls Ideas
Designing a framed gallery wall is one of the most transformative ways to add character, scale, and visual interest to a home. Without a clear spatial plan, hanging multiple frames can quickly lead to misaligned art, cluttered walls, and unnecessary nail holes.
The secret to a polished gallery wall lies in layout geometry, consistent spacing, and eye-level alignment. By balancing frame dimensions, matting widths, and finishes—whether choosing an architectural grid, an organic salon-style hang, or an elongated horizontal spine—you can display family photography, fine art, and personal prints with professional precision.
Whether styling a high-ceiling living room, a narrow hallway corridor, a staircase wall, or a bedroom headboard, these curated frame layouts provide hanging blueprints, spacing measurements, and production-ready visual prompts.
Why This Idea Is Trending & Flattering
-
Architectural Anchor: Effectively scales art to match large furniture pieces (like sofas and credenzas) without requiring a single oversized print.
-
Cohesive Storytelling: Allows mixing family portraits, travel photography, typography, and line art into a unified narrative.
-
Flexible & Expandable: Asymmetric and ledge-based layouts allow you to swap or add new prints over time without re-measuring the entire wall.
-
Enhances Natural Proportions: Vertical stacks exaggerate ceiling height, while wide horizontal layouts make narrow rooms feel expansive.
-
Customizable for Any Budget: Achieves high-end interior impact using affordable, standard-sized frames paired with generous white matting.
Materials, Spacing Standards & Hardware Foundation Guide
Essential Spacing & Hanging Standards
-
The 57-to-60-Inch Center Rule: The horizontal center of the entire layout should sit between 57 and 60 inches from the finished floor (average human eye level).
-
Furniture Clearance: Maintain 6 to 10 inches of clear wall space between the bottom edge of the lowest frames and the top of a sofa back or console table.
-
Inter-Frame Spacing: Keep gaps between adjacent frames strictly uniform:
-
Symmetrical Grids: 2 to 3 inches apart.
-
Eclectic Salon Displays: 2.5 to 3.5 inches apart.
-
Staircase Layouts: 3 to 4 inches apart.
-
Professional Hanging Tooling & Hardware
-
Hardware: Brass picture hanging hooks with hardened steel nails (rated for 20–50 lbs), heavy-duty drywall anchors, and D-ring hangers on frame backs.
-
Measurement & Leveling: Laser level, 24-inch torpedo level, painter’s tape (for outlining layouts on the wall before hammering), and a tape measure.
-
Stabilization: Clear adhesive rubber bumper pads on the bottom corners of every frame to keep them level and protect walls from scuffs.
1. The Classic Symmetrical Architectural Grid
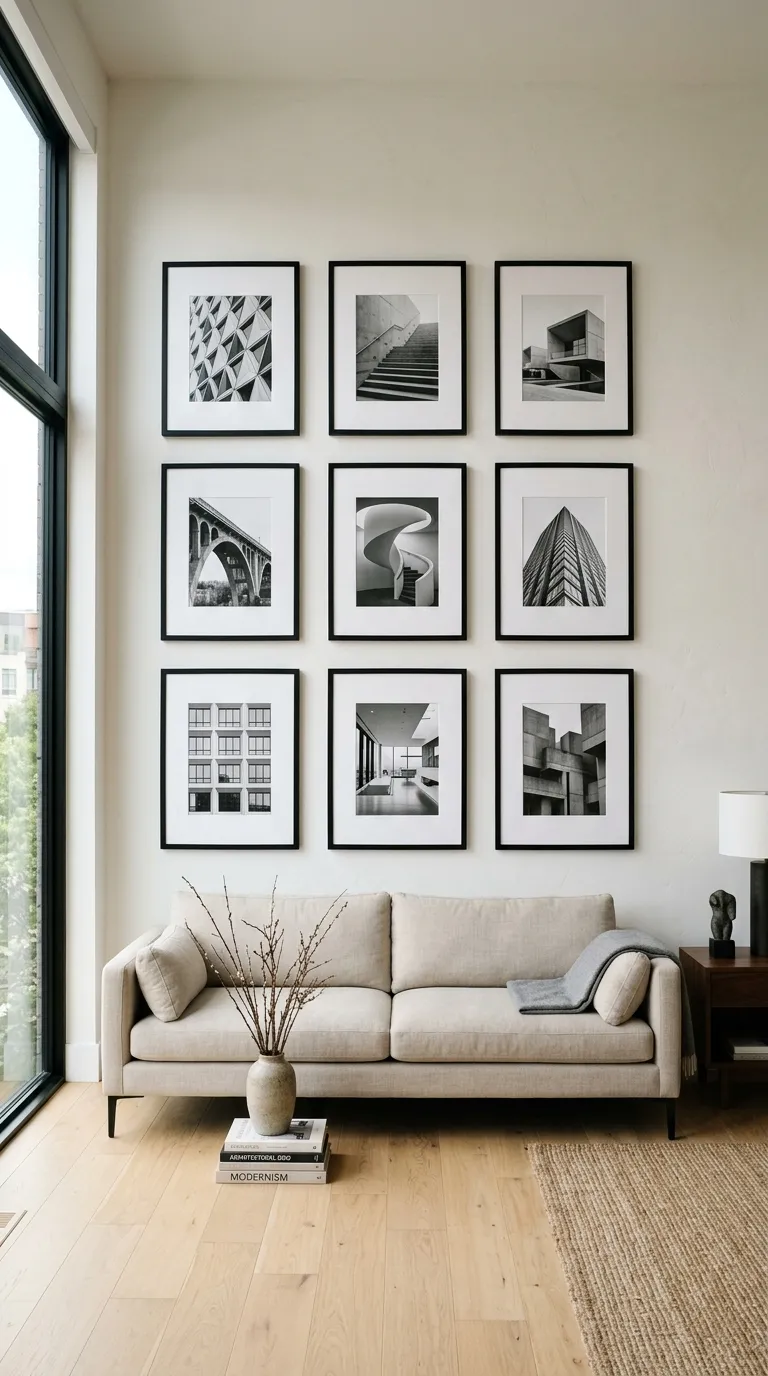
Layout Blueprint & Spatial Flow
A crisp, geometric matrix composed of identical square or rectangular frames with oversized white mats, arranged in precise rows and columns (e.g., $2times3$, $3times3$, or $2times4$).
Step-by-Step Execution Guide
-
Select 6 or 9 matching frames (such as $16times20$-inch frames matted to $8times10$-inch photo openings).
-
Choose thin, uniform frames in matte black, brushed brass, or natural white oak.
-
Use a laser level to establish a perfectly level top horizontal baseline.
-
Hang the center top frame first, maintaining a strict 2-inch gap between all adjacent edges.
-
Print photography in a unified filter (such as all high-contrast black-and-white or sepia).
Pro Hanging Tip
Stick small pieces of reusable mounting putty or adhesive rubber dots behind the bottom corners of each frame to prevent them from shifting when doors close.
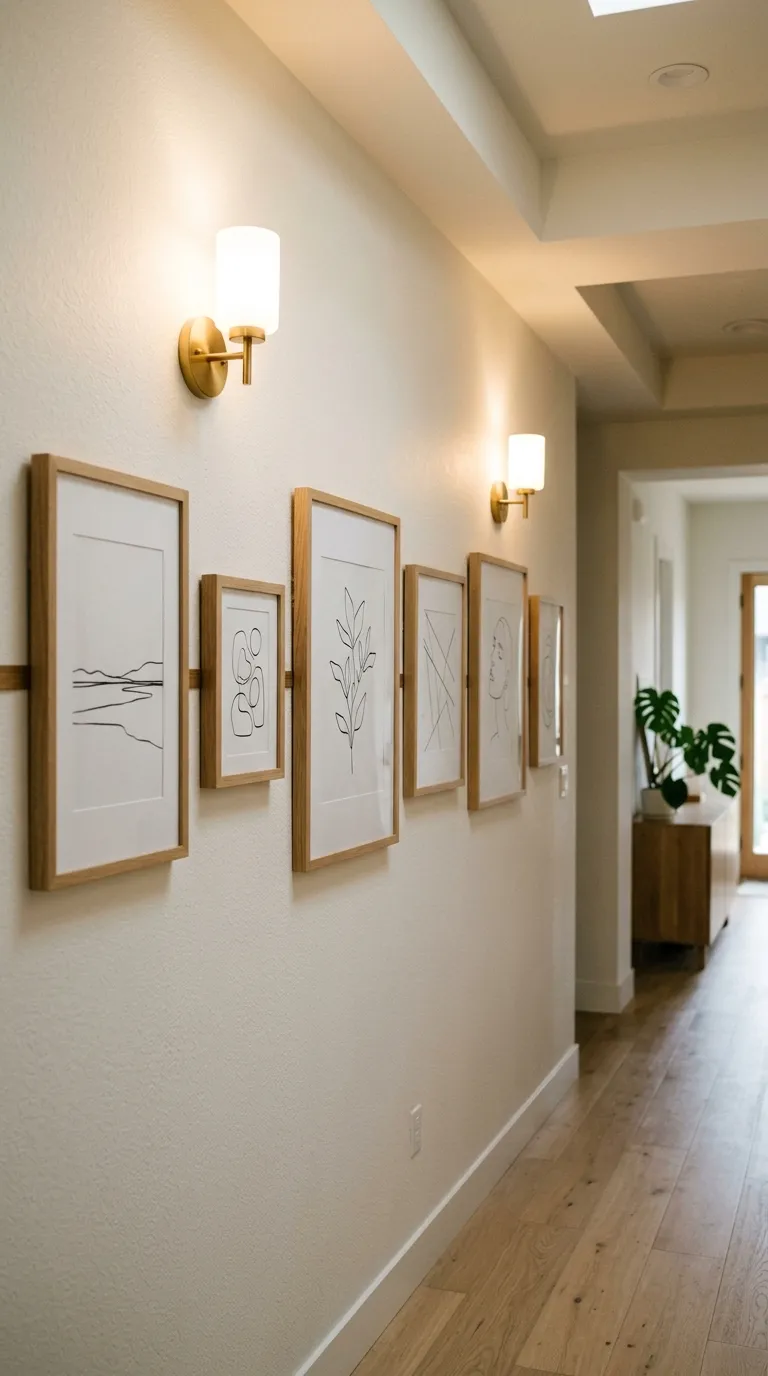
2. The Horizontal Linear Spine Alignment
Layout Blueprint & Spatial Flow
A balanced layout where frames of varying vertical heights are aligned along an invisible continuous horizontal center line running across the wall.
Step-by-Step Execution Guide
-
Snap a horizontal chalk line or run blue painter’s tape across the wall at 58 inches high.
-
Select 4 to 6 frames of different heights (e.g., two $16times20$, two $11times14$, and two $8times10$).
-
Align the exact vertical midpoint of every frame directly over the horizontal reference line.
-
Keep horizontal spacing between frames consistent at 3 inches.
-
Hang larger frames toward the center and smaller frames toward the outer edges for visual balance.
Pro Hanging Tip
This layout works best along elongated walls, dining room sideboards, and long hallway corridors.
3. The Balanced Center Anchor (Triptych Core)
Layout Blueprint & Spatial Flow
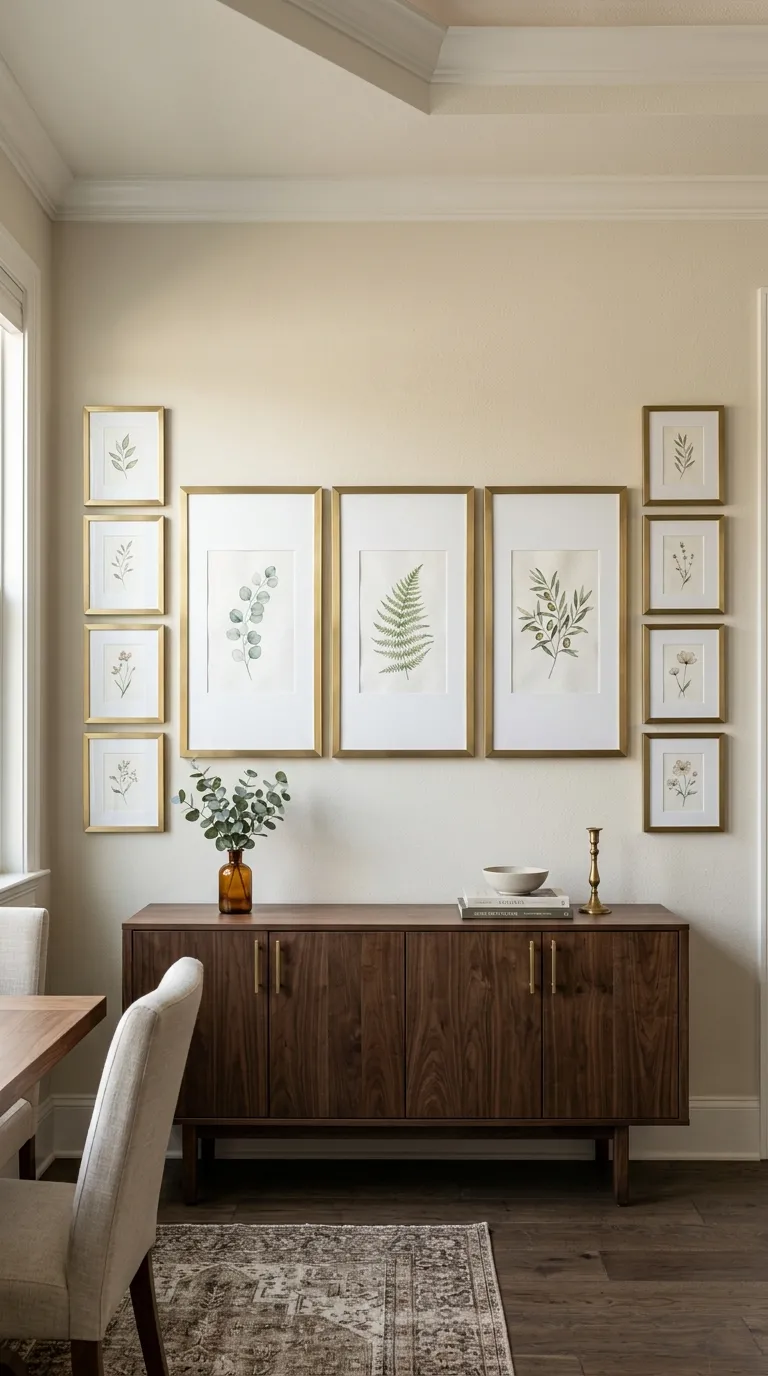
A structured layout anchored by three large, matching focal frames in the center (a triptych), flanked symmetrically by pairs of smaller vertical frames on the outer wings.
Step-by-Step Execution Guide
-
Hang three large $18times24$-inch matching frames side-by-side in the center with 2.5-inch gaps.
-
On the left and right outer sides, hang two stacked $11times14$-inch frames per side.
-
Ensure the total top and bottom boundaries of the stacked side frames align flush with the top and bottom edges of the central large frames.
-
Use matching frame materials across all pieces to maintain cohesive structure.
Pro Hanging Tip
Use the three center frames for a continuous panoramic landscape triptych and the outer frames for complementary detail shots.
4. The Organic Asymmetrical Salon-Style Wall
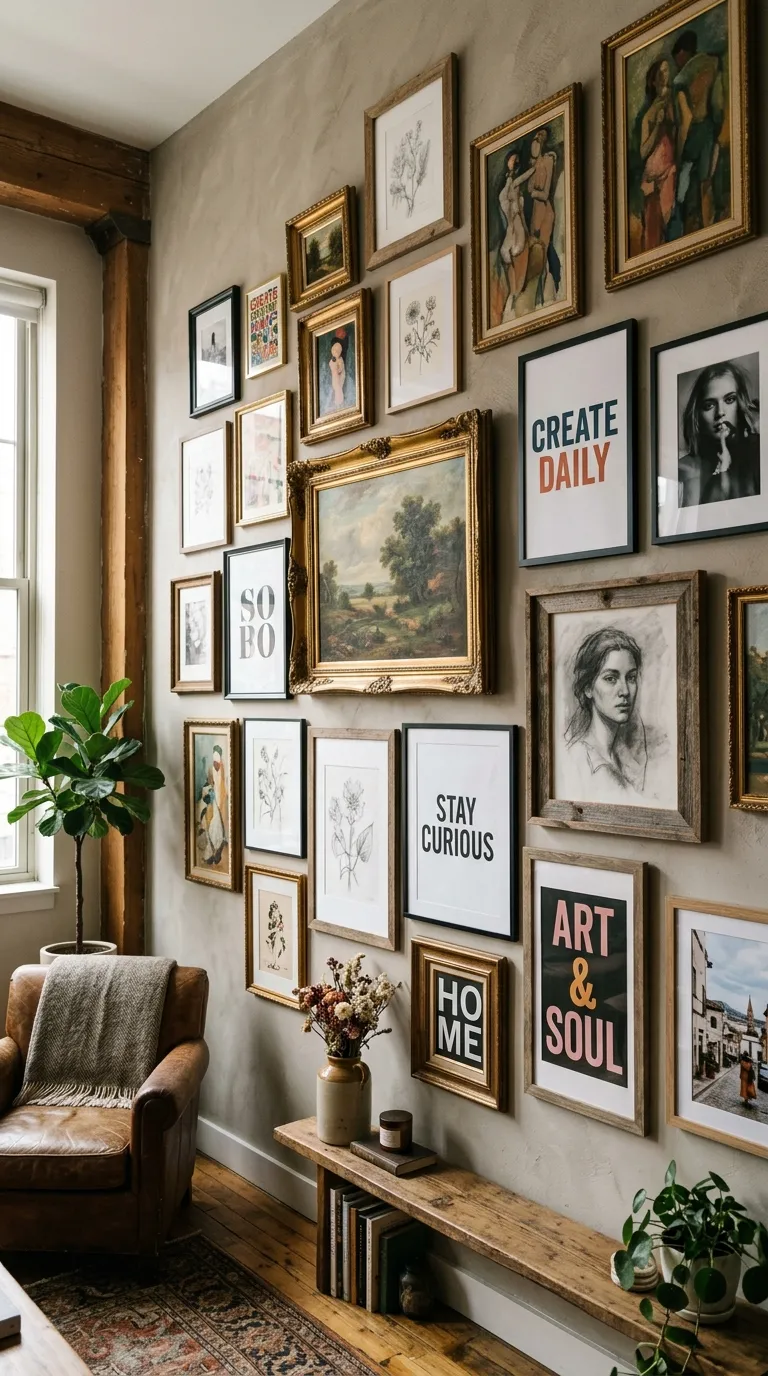
Layout Blueprint & Spatial Flow
An eclectic, collected-over-time arrangement mixing varied frame sizes, materials, and art mediums that expands outward organically from a central statement piece.
Step-by-Step Execution Guide
-
Choose your largest statement piece (approx. $24times36$ inches) and hang it slightly off-center at eye level.
-
Cut butcher paper templates for all remaining frames and tape them to the wall using painter’s tape.
-
Arrange medium and small frames radiating outward, maintaining a consistent 2.5- to 3-inch gap between all borders.
-
Mix metal finishes (brass, black steel) with natural timbers and varied art (oil paintings, pencil sketches, typography).
-
Keep the outer perimeter shape loosely rectangular or oval to maintain overall visual harmony.
Pro Hanging Tip
Photograph your butcher paper layout with your phone before driving nails into the wall to verify composition and spacing from across the room.
5. The Dynamic Parallel Staircase Gallery
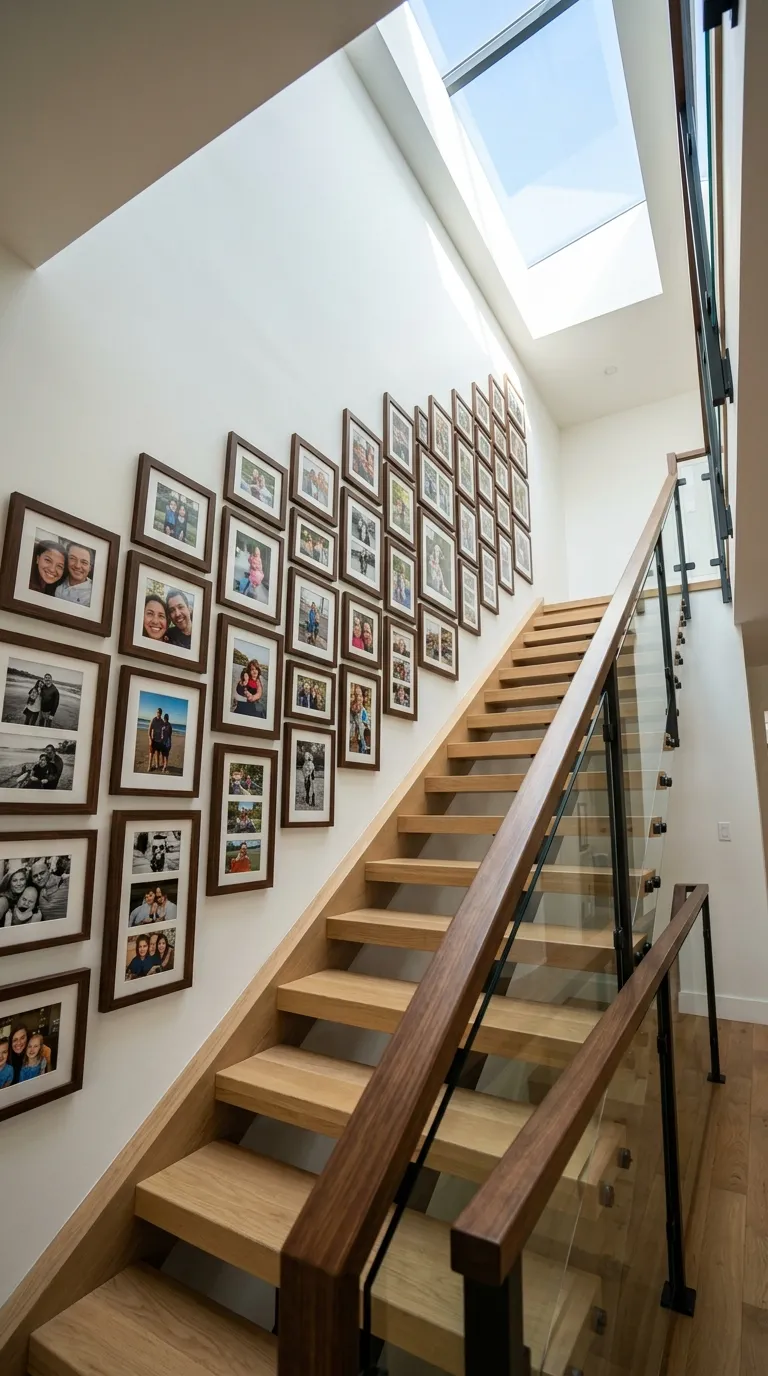
Layout Blueprint & Spatial Flow
A stepped layout that mirrors the diagonal angle of a staircase, maintaining a uniform clearance above the handrail or stair treads.
Step-by-Step Execution Guide
-
Measure a set height (typically 56 to 60 inches) directly up from every third stair tread to create a diagonal reference slope.
-
Run a strip of painter’s tape along this diagonal line parallel to the stair stringer.
-
Position frames so their bottom edges align consistently 8 to 10 inches above the staircase baseline.
-
Maintain a standard 3-inch gap between frames horizontally.
-
Use cohesive frame colors (such as all dark walnut or all white) to ground the diagonal movement.
Pro Hanging Tip
Never hang frames lower than 48 inches above stair treads to prevent shoulders or carried laundry baskets from knocking against the glass.
6. The Dual Deep Picture Ledge Layered Display
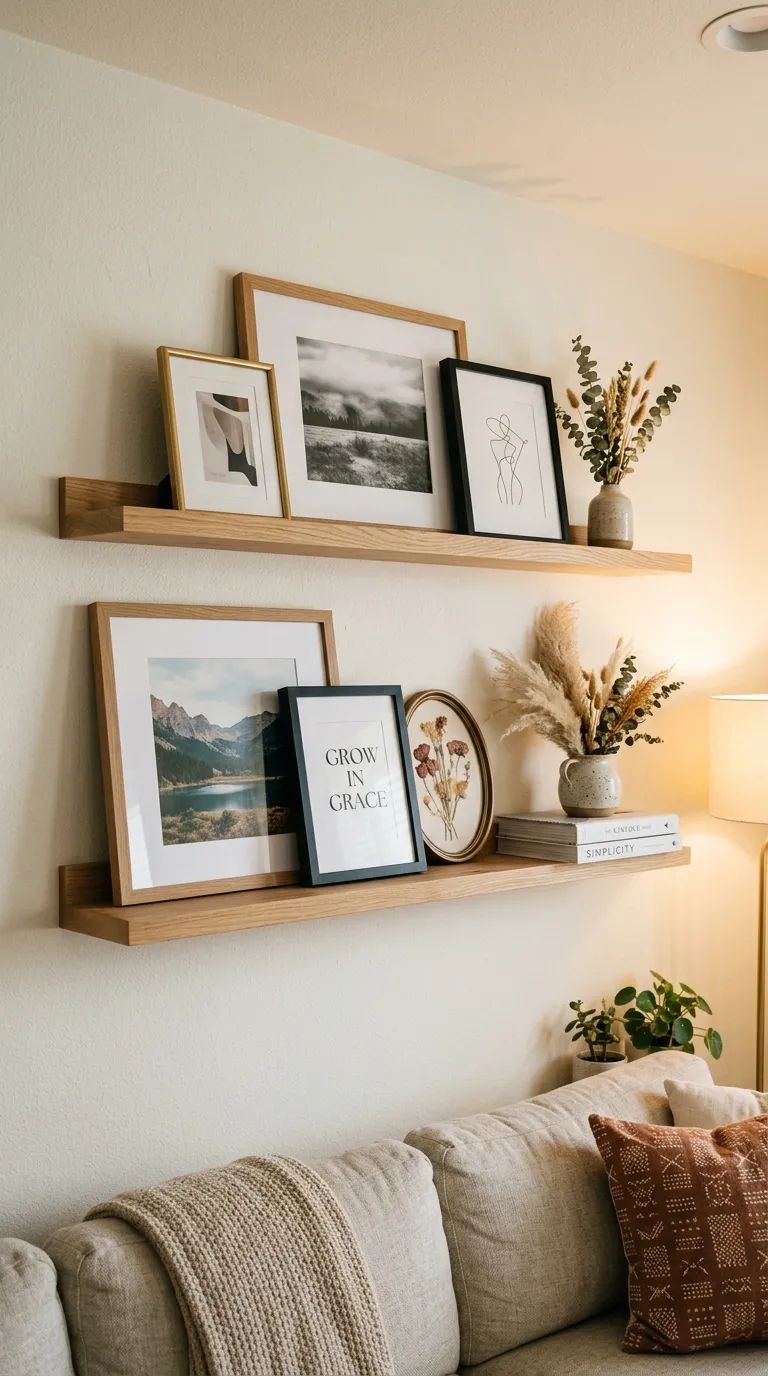
Layout Blueprint & Spatial Flow
Two long, parallel horizontal floating picture ledges with a front retaining lip, allowing frames of all sizes to lean, overlap, and swap out with zero wall damage.
Step-by-Step Execution Guide
-
Mount two 48- to 60-inch floating picture ledges (3.5 inches deep) to wall studs, spaced 16 to 18 inches apart vertically.
-
Rest large frames directly against the wall on the ledges.
-
Layer smaller, overlapping frames in front of the larger ones at a slight 10-degree lean.
-
Inset small decorative accents—such as small brass vases, dried botanicals, and sculptural ceramics—between the frames.
-
Paint the ledges the exact same color as the wall for a seamless built-in look.
Pro Hanging Tip
Picture ledges allow you to rotate art seasonally without measuring, leveling, or patching drywall nail holes.
7. The Floor-to-Ceiling Vertical Column Pair
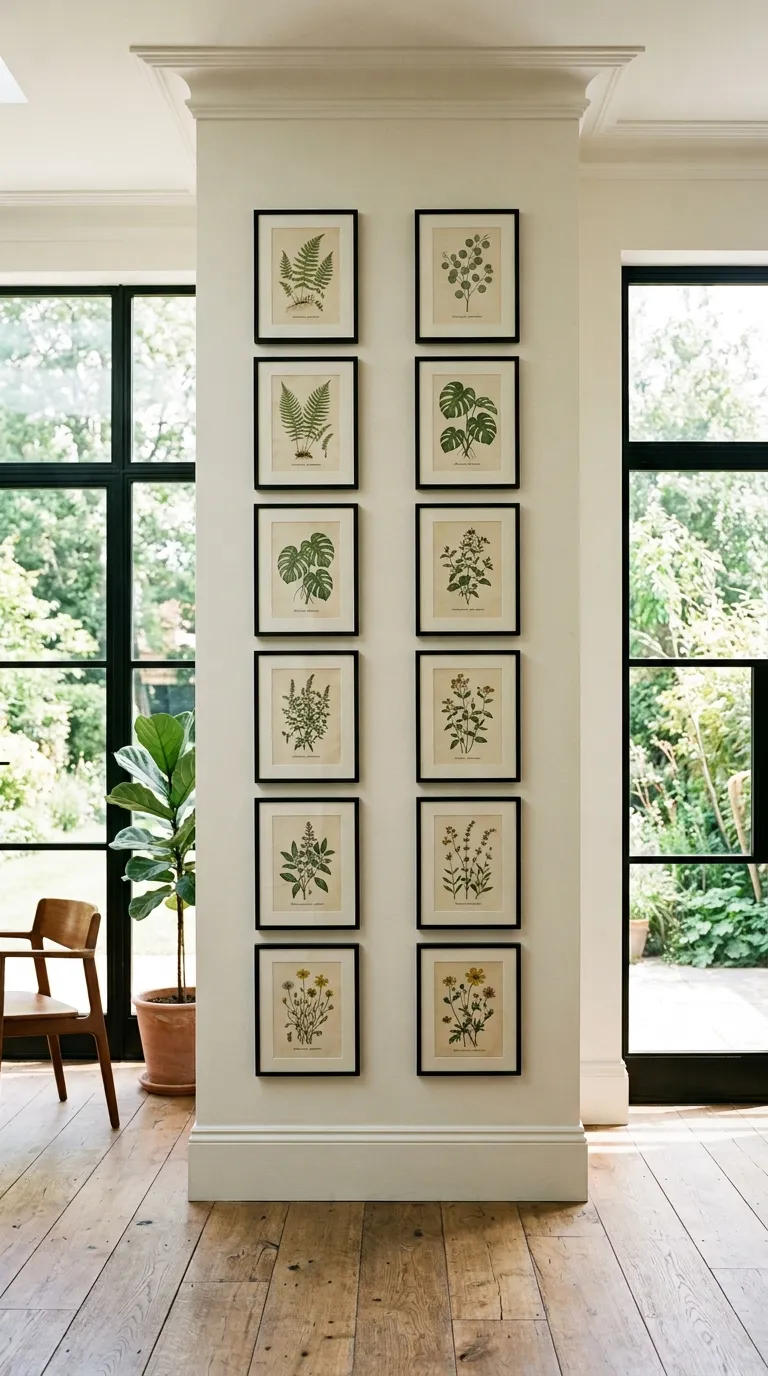
Layout Blueprint & Spatial Flow
A vertical layout consisting of two narrow, parallel columns of stacked frames stretching from near-baseboard height to within 12 inches of the ceiling.
Step-by-Step Execution Guide
-
Measure a narrow, underutilized wall space (such as between two windows or beside a tall doorway).
-
Align two vertical columns of 4 to 5 small matching frames ($8times10$ or $10times12$ inches).
-
Space frames 2 inches apart vertically and horizontally.
-
Fill frames with a cohesive series of botanical line illustrations, vintage architectural sketches, or cyanotypes.
-
Keep matting wide and identical across all frames.
Pro Hanging Tip
Vertical stacks draw the eye upward, exaggerating vertical scale and making low-ceiling rooms feel taller.
8. The Modern Corner-Wrap Gallery
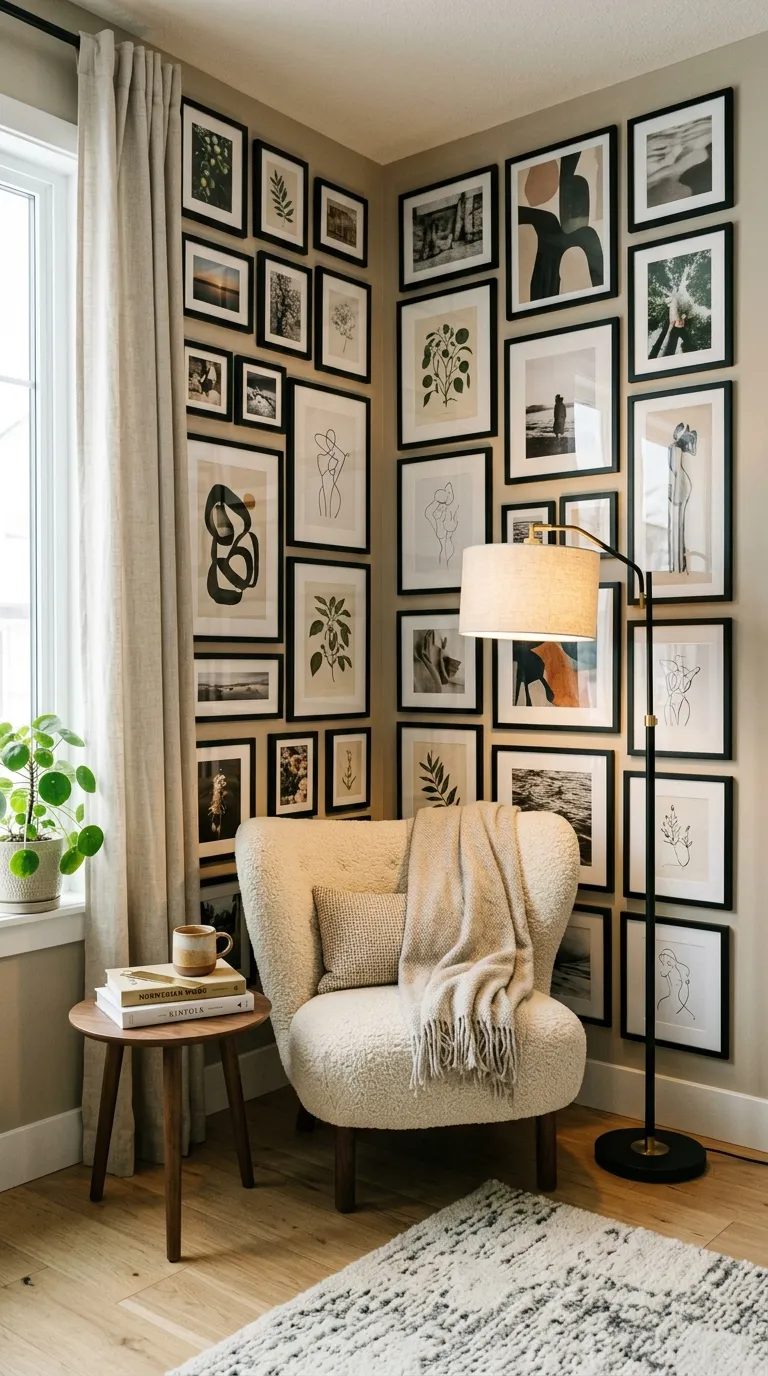
Layout Blueprint & Spatial Flow
A continuous, immersive layout where art flows seamlessly around a 90-degree interior room corner, visually connecting two adjacent walls.
Step-by-Step Execution Guide
-
Select frames of uniform depth (preferably slim metal or minimalist wood profiles).
-
Hang frames along Wall A, placing the final edge 3 inches away from the interior corner.
-
Continue the layout onto Wall B, starting the first frame 3 inches away from the corner.
-
Align horizontal centers across both walls to ensure an unbroken line of sight.
-
Use matching mats and complementary art subjects across both sides of the corner.
Pro Hanging Tip
Ensure frame mouldings are low-profile (under 1 inch deep) near the corner so frames do not collide or cast deep shadows on one another.
9. The Bounded Outer Perimeter “Block” Wall
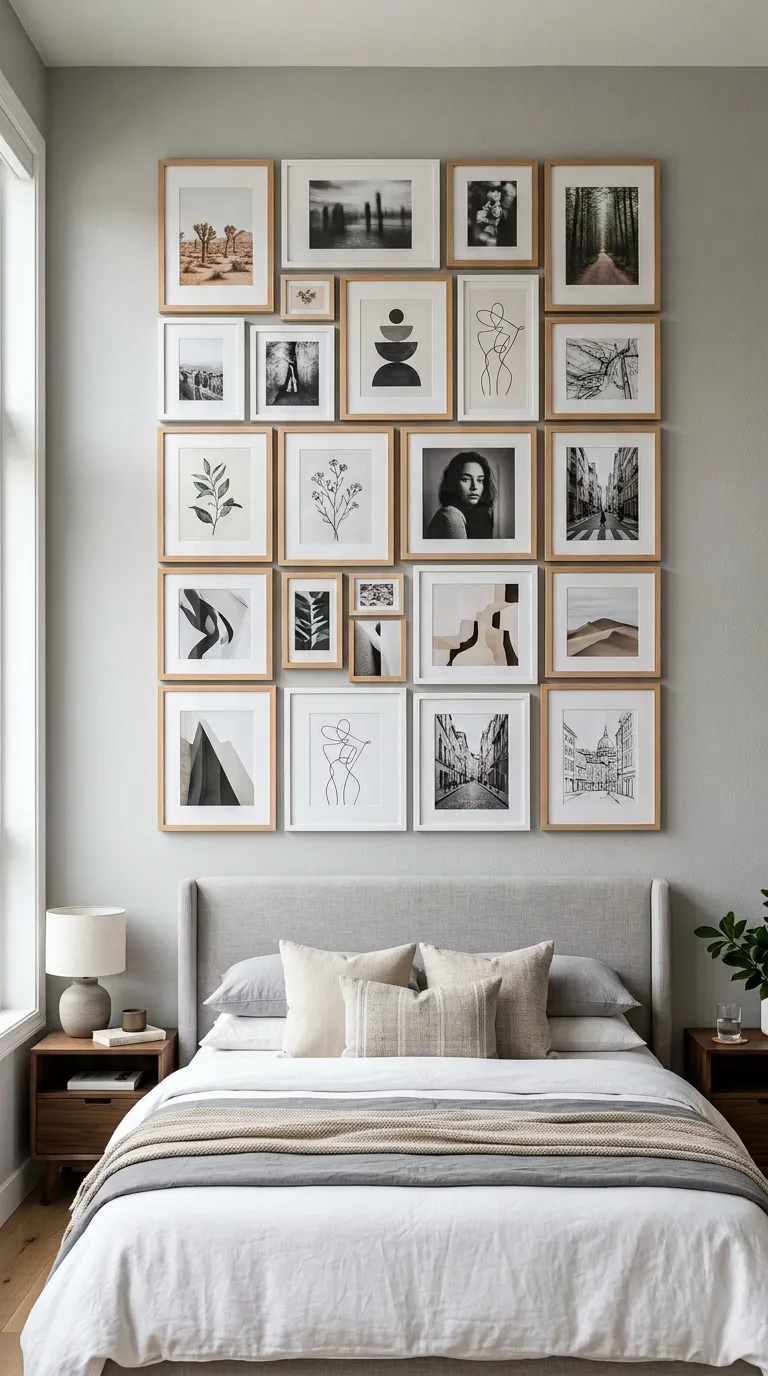
Layout Blueprint & Spatial Flow
A puzzle-style layout where multiple different frame sizes are arranged so their collective outer edges form a sharp, clean rectangle or square.
Step-by-Step Execution Guide
-
Mark an exact rectangular boundary on the wall with painter’s tape (e.g., $60times40$ inches).
-
Place large horizontal and vertical anchor frames into the four outer corners of the box.
-
Fill the interior space with smaller frames fitted together like tiles, keeping all interior gaps strictly at 2 inches.
-
Ensure no frame extends outside the taped perimeter line.
-
Use a mix of photography and typography prints framed in black and white mats.
Pro Hanging Tip
Work from the four outer corners inward toward the center to ensure the boundary lines remain straight and square.
10. The Panoramic Diptych / Minimalist Oversized Pair
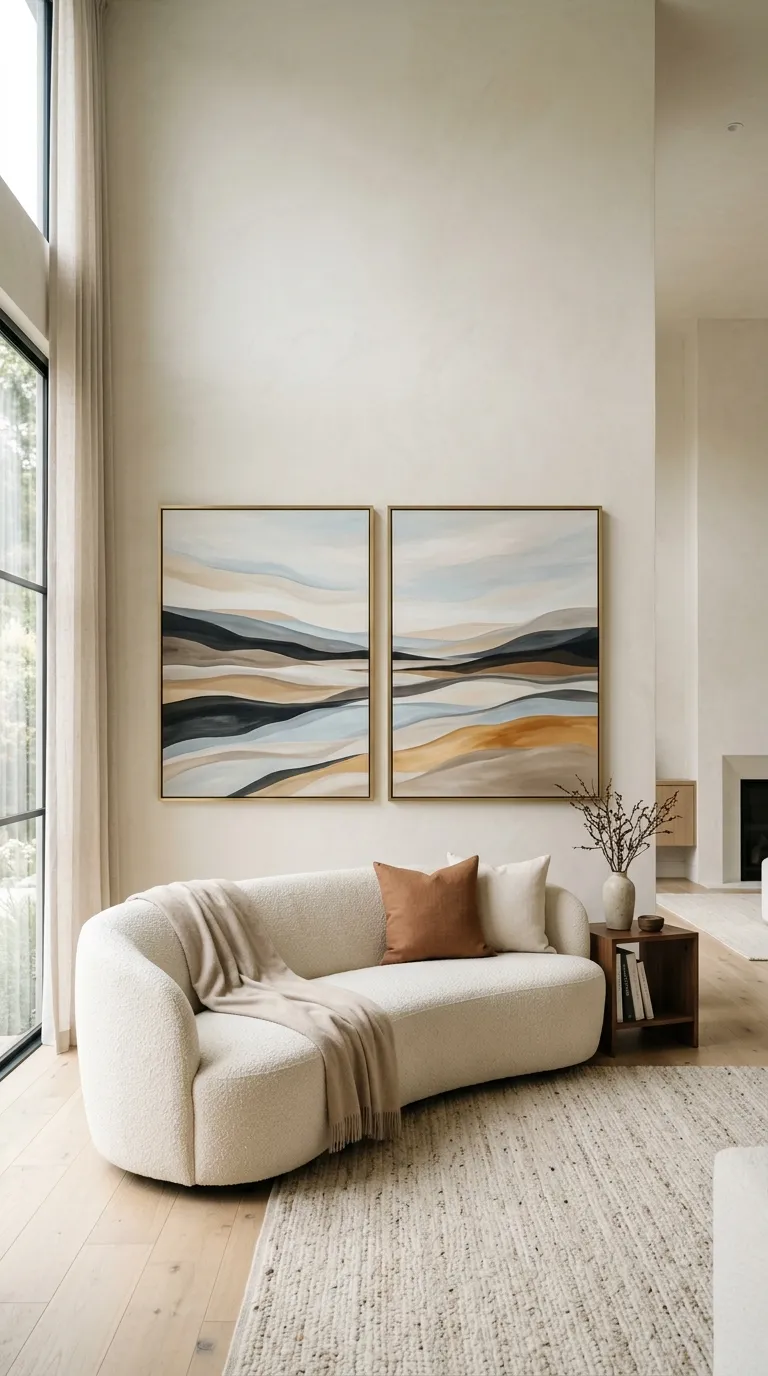
Layout Blueprint & Spatial Flow
A clean, high-impact minimalist setup consisting of exactly two oversized statement frames mounted side-by-side with a narrow gap.
Step-by-Step Execution Guide
-
Select two large matching frames (minimum $24times36$ or $30times40$ inches).
-
Choose prints that form a split panoramic landscape or two complementary abstract fine-art pieces.
-
Center the pair over a sofa, dining sideboard, or bed headboard.
-
Hang the two frames close together, leaving only 2 to 3 inches of breathing space between them.
-
Center the vertical midpoint of the frames at 58 inches from the floor.
Pro Hanging Tip
Keeping the gap between two oversized frames under 3 inches makes them read as a single architectural installation rather than two disconnected pieces.
Layout Concept & Planning Comparison
| Frame Layout Concept | Symmetry Style | Spacing Standard | Frame Quantity | Best Suited Wall |
| Architectural Grid | Fully Symmetrical | 2.0 – 2.5 Inches | 6, 8, or 9 Frames | Formal Living / Dining / Foyer |
| Linear Spine | Horizontal Centered | 3.0 Inches | 4 to 6 Frames | Long Hallways / Above Credenzas |
| Triptych Core | Symmetrical Center | 2.5 Inches | 7 Frames | Feature Sofa Walls |
| Asymmetrical Salon | Eclectic Organic | 2.5 – 3.5 Inches | 8 to 15+ Frames | Creative Lofts / High Ceilings |
| Staircase Diagonal | Stepped Slope | 3.0 – 4.0 Inches | 6 to 10 Frames | Open Stairwell Walls |
| Dual Picture Ledges | Overlapping Flexible | Non-fixed (Lean) | 6 to 12 Frames | Casual Living / Home Offices |
| Vertical Column Pair | Vertical Symmetrical | 2.0 Inches | 8 to 10 Frames | Between Windows / Tight Piers |
| Corner-Wrap | Continuous 90-Degree | 3.0 Inches | 6 to 12 Frames | Reading Nooks / Studio Corners |
| Bounded Block | Outer-Box Flush | 2.0 Inches | 7 to 11 Frames | Bed Headboards / Entryways |
| Panoramic Diptych | Minimalist Pair | 2.0 – 3.0 Inches | Exactly 2 Frames | Above Sofas / Master Suites |
Common Hanging Mistakes & How to Avoid Them
-
Hanging Art Too High: Mounting frames relative to the ceiling rather than eye level causes strain and disconnects art from furniture. Solution: Always align the vertical center of your arrangement at 57 to 60 inches from the floor.
-
Ignoring Frame Scale Relative to Furniture: Hanging a small cluster of frames over an 8-foot sofa makes the arrangement look lost. Solution: Ensure the total width of your frame layout covers 60% to 75% of the furniture’s total width.
-
Inconsistent Inter-Frame Gaps: Eyeballing distances between frames leads to distracting crooked lines. Solution: Cut a small piece of wood or cardboard to your exact gap measurement (e.g., 2 inches) and use it as a physical spacer block while leveling.
-
Neglecting Wall Studs and Anchor Ratings: Using basic nails for heavy glass-fronted frames can result in frames falling. Solution: Use metal drywall toggle anchors or drive brass picture hooks directly into wooden wall studs for frames over 15 lbs.